Up and Running — Next.js and TypeORM
Welcome to Up and Running — Part II
In my previous article, I talked about how to get Now up and running with multiple environments. We used a boilerplate Next.js app and added a single environment variable to show our intended deployment on the landing page. Today, I’d like to take that app a bit further and show how to integrate Next.js serverless API functions with TypeORM and Postgres. While this still won’t cover everything, by the end we will be able to:
- Add a User model
- Make a migration
- Create a User Factory
- Seed our database
- Add a getUser call to the API
- Use the said call to display data
What this won’t cover:
- Database Pooling
- Hosting the DB
- Unit testing
- End to End testing
- CI Testing
I’ll be continuing the series hoping to address the above as this tech stack progresses. For now, let’s get this app running with some data.
Note: As stated in the previous article, ZEIT is still a moving target. I’ve been keeping watch over threads. While this is an example of a current setup, I am aware they are still actively adding features and sifting through requests. Should this setup change I’ll create a follow-up post. This is not the single and only way to do things.
TypeORM
If you’ve worked with an ORM you should be good here. The main benefit of using this one was out of the box TypeScript support. I’m not going to dive into the specifics of TypeORM but we will be covering the config setup and I’ll have a few examples along the way. I am going to go ahead and define some terms here as I’ll be using them throughout this post.
Entity: (Model) A class that maps to a database table. This also provides typescript annotations to our app.
Entity Manager / Repository: TypeORM has a couple of ways to interact with your model based on your needs. For this example, we will be using the getRepository helper which allows us to call utils such as .create, .save, .find, etc. The repository is how our app will interact with our database.
Migrations: TypeORM will compare your Entities to Postgres and auto-create a migration file. Running the generate command will create a timestamped file with the needed up and down SQL. 90% of the time this will be all you need. However, I will note I’ve seen some edge cases when trying to update fields to something new, say an enum type, where this SQL may be off. Regardless, these files are generated but not set in stone. You can edit at will if something needs to be added. It’s always good to double-check.
Dependencies
You can follow along in my example repo here on the next-typeorm-example branch or if you would like you may add these dependencies into your Next.js app and give these snippets a go.
Dependencies:
- dotenv: used in our yarn scripts to point to the needed
.env.environmentfile - reflect-metadata: used for Typescript/TypeORM to reflect our Entities
- typeorm
Dev dependencies:
- chance
- ts-node
- typescript
Setting up the DB
TypeORM has a lot of built-in helpers for generating the core entities and migration files. You can install this dependency globally, but we would like to use these commands in our yarn scripts in pair with dotenv and keep our package versions under control.
To start we are going to look at a couple of setup scripts that will leave us with a base User model.
"db:setup": "yarn db:create:dev && yarn db:create:test",
"db:create:dev": "createdb --owner=postgres next_now_dev",
"db:create:test": "createdb --owner=postgres next_now_test",
"g:migration": "yarn typeorm:local migration:generate -n",
"g:entity": "yarn typeorm:local entity:create -n",
"typeorm:local": "yarn local ./node_modules/typeorm/cli.js",
"local": "DOTENV_CONFIG_PATH=./.env ts-node -P ./tsconfig.yarn.json -r dotenv/config",
The first block of lines here is fairly straight forward. We want to create a quick db:setup script that will create our Postgres tables. This just helps on-board others and helps yourself remember when the project has set on a shelf for a month or two. Things I never do.
The next block starts to hone in on our actual TypeORM calls we want to leverage. Specifically these two scripts typeorm entity:create -n typeorm migration:generate -n. Remember we want to use typeorm from our node_modules and not the global install, so we've added another script to help locate that file with typeorm:local. We've also conveniently named this with :local for semantic purposes to know which environment we aim to leverage. With one last helper that utilizing dotenv for the environment variables needed. (You'll note there's a tsconfig in here as well, but more on that later).
Environment Variables and TypeORM config
So we have a script that creates our databases and scripts to create an entity and create a new migration file. However, if you run any of the generate commands now, things will begin to break. TypeORM isn’t aware of your database just yet.
If you are following along in the repo take a peek at .env.example quite a few variables have been added in for TypeORM.
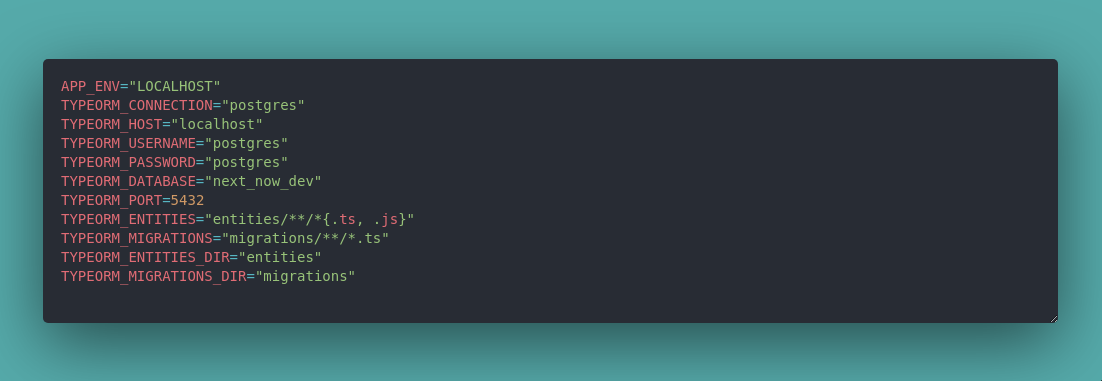
You have the normal DB setup here with connection type, host, db, port, etc. but we also have some ENV’s set for Entities Migrations and their respective directories. TypeORM will look to these files when making a comparison for migrations and use the directories when we generate new content. If you look into the root of our project you’ll see a folder set for both.
Adding these to our .env file we can now try out our first command. yarn g:entity User. You should see a new User.ts file appear within your entities folder. As exciting as it looks this will be our base for adding the User model and table to Postgres.

Adding the user table
Let’s start building this User Entity out. I’m going to be covering a handful of example types here just to show how TypeORM migrations shine. TypeORM uses its helpers to define columns for the database tables. We also include our public and private typings here on the Entity for TypeScript. For starters, let’s add name and email columns by importing the Column helper from typeorm. We will also go ahead and import Index to make our email filed unique.
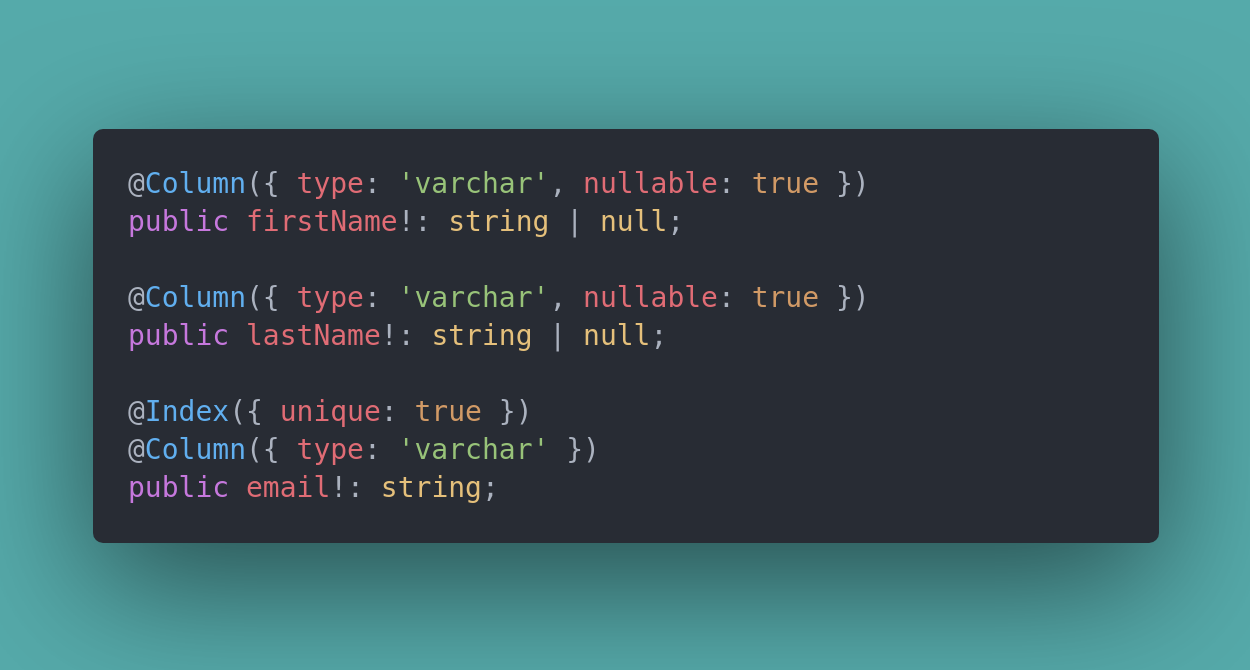
Taking a closer look you’ll notice that Column takes an object of keys that are database specific. Underneath each of these, you’ll also see the field is defined as a public field for typescript. A quick note, you can define different field names within Column if you would like to map to something different. eg. first_name maps to firstName. We’ll see how this all plays out in a second but for now, let’s keep going.
Enums. At some point, you’ll want to add a field that has limited values. For this example, we are going to add a role to the user. Similar to the other fields we will still use Column, but expand on the type options for Postgres. We’ve also defined this as a constant type to use within our application code.
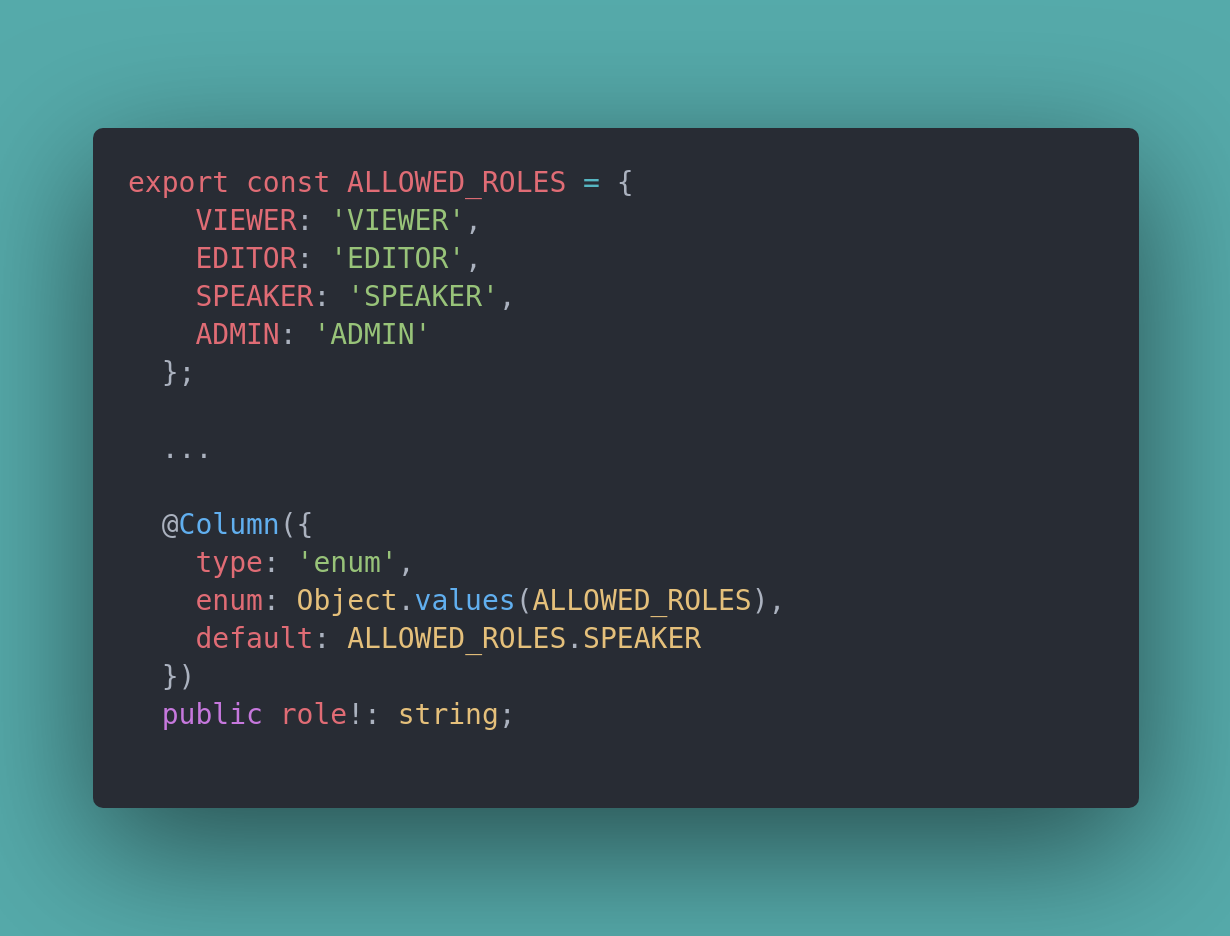
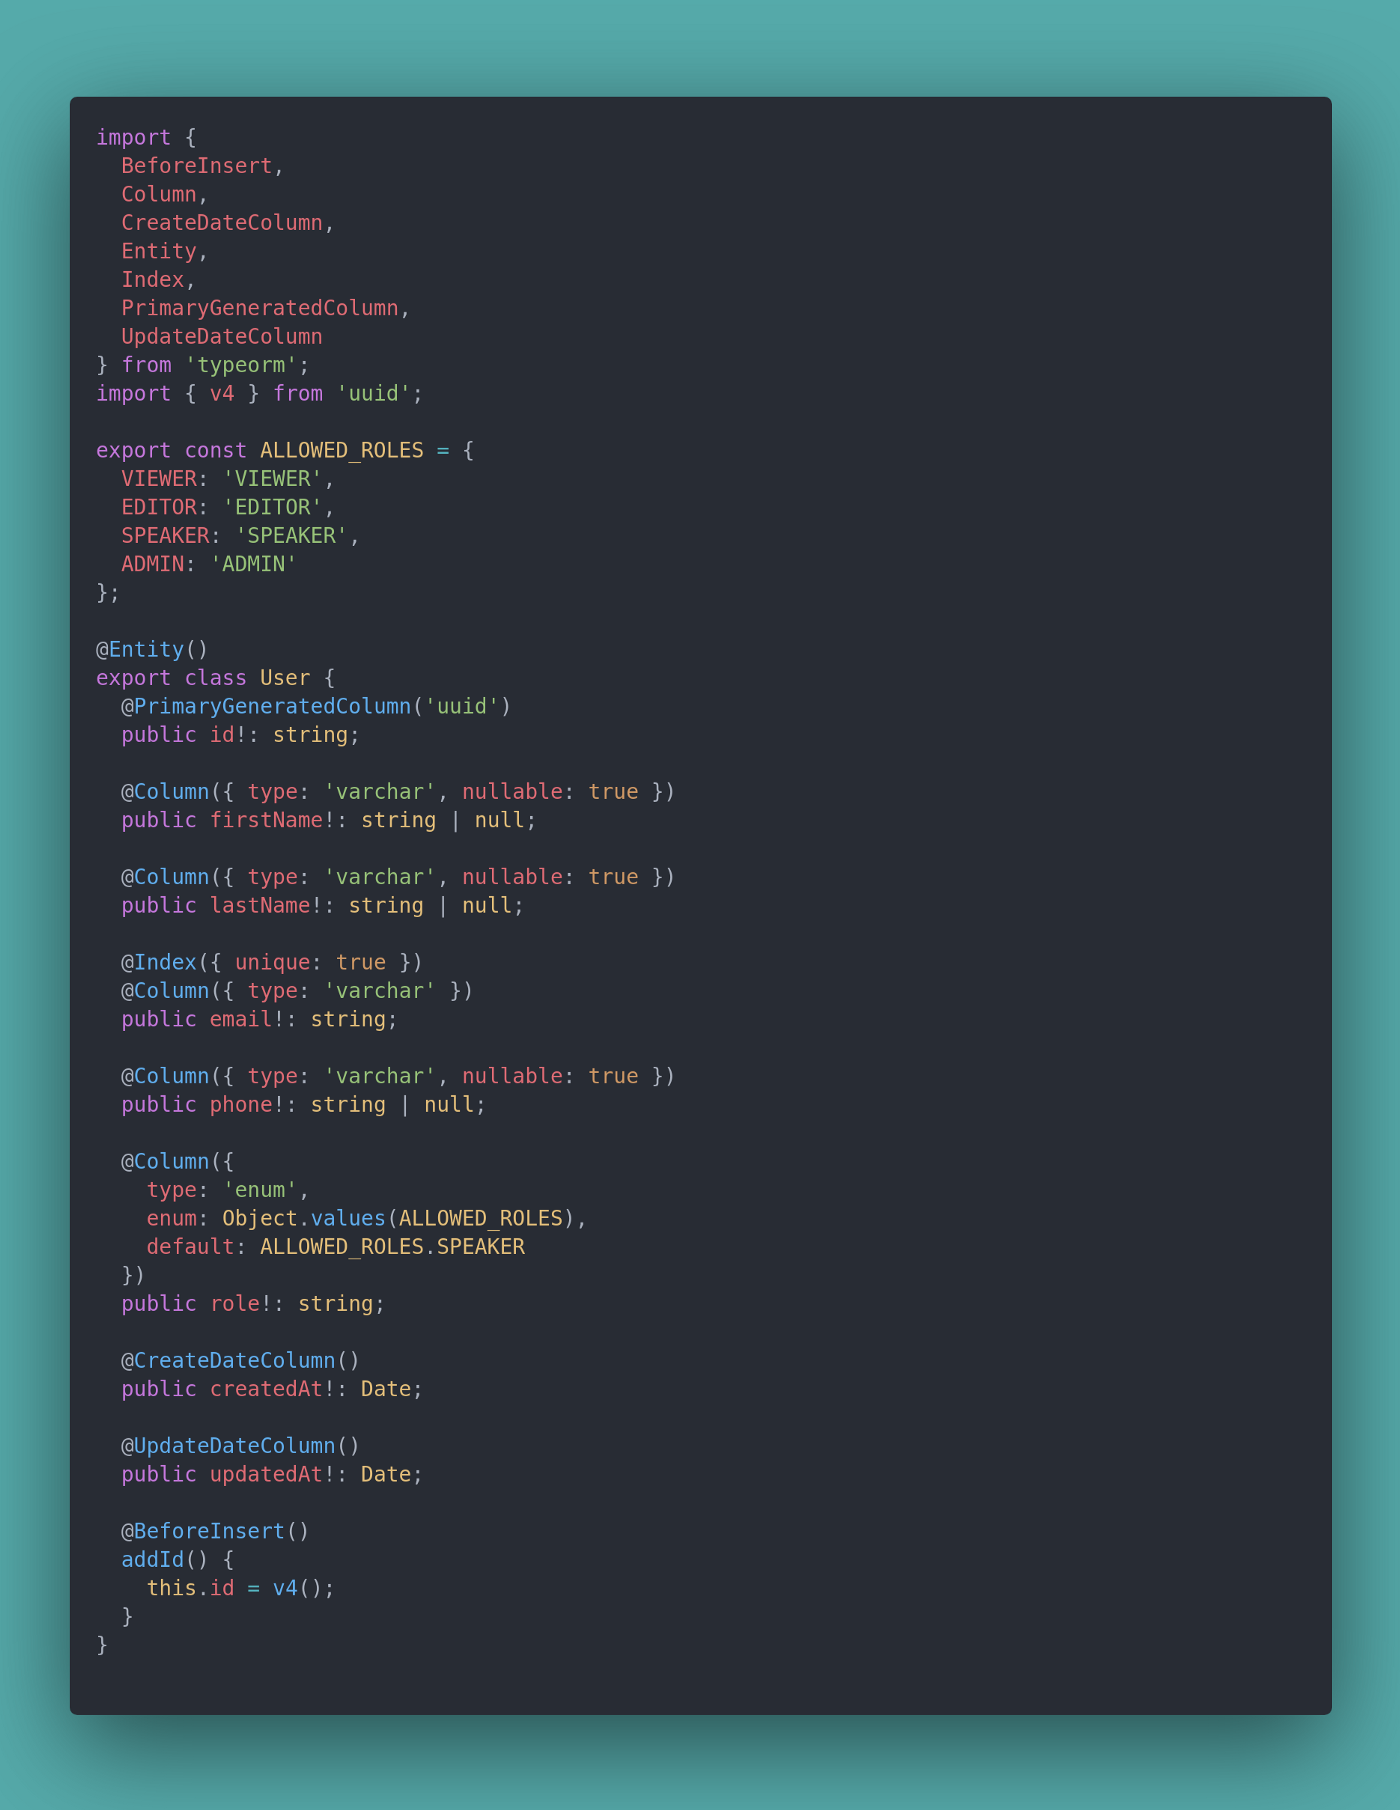
Finally, you’ll notice I’ve used TypeORM’s utils for timestamps and primary keys. I’ve also brought in a before insert helper to set the primary id to a UUID rather than the Postgres default of 1, 2, 3. I know this is a lot but you altogether you should be looking at something like this.
Migrations
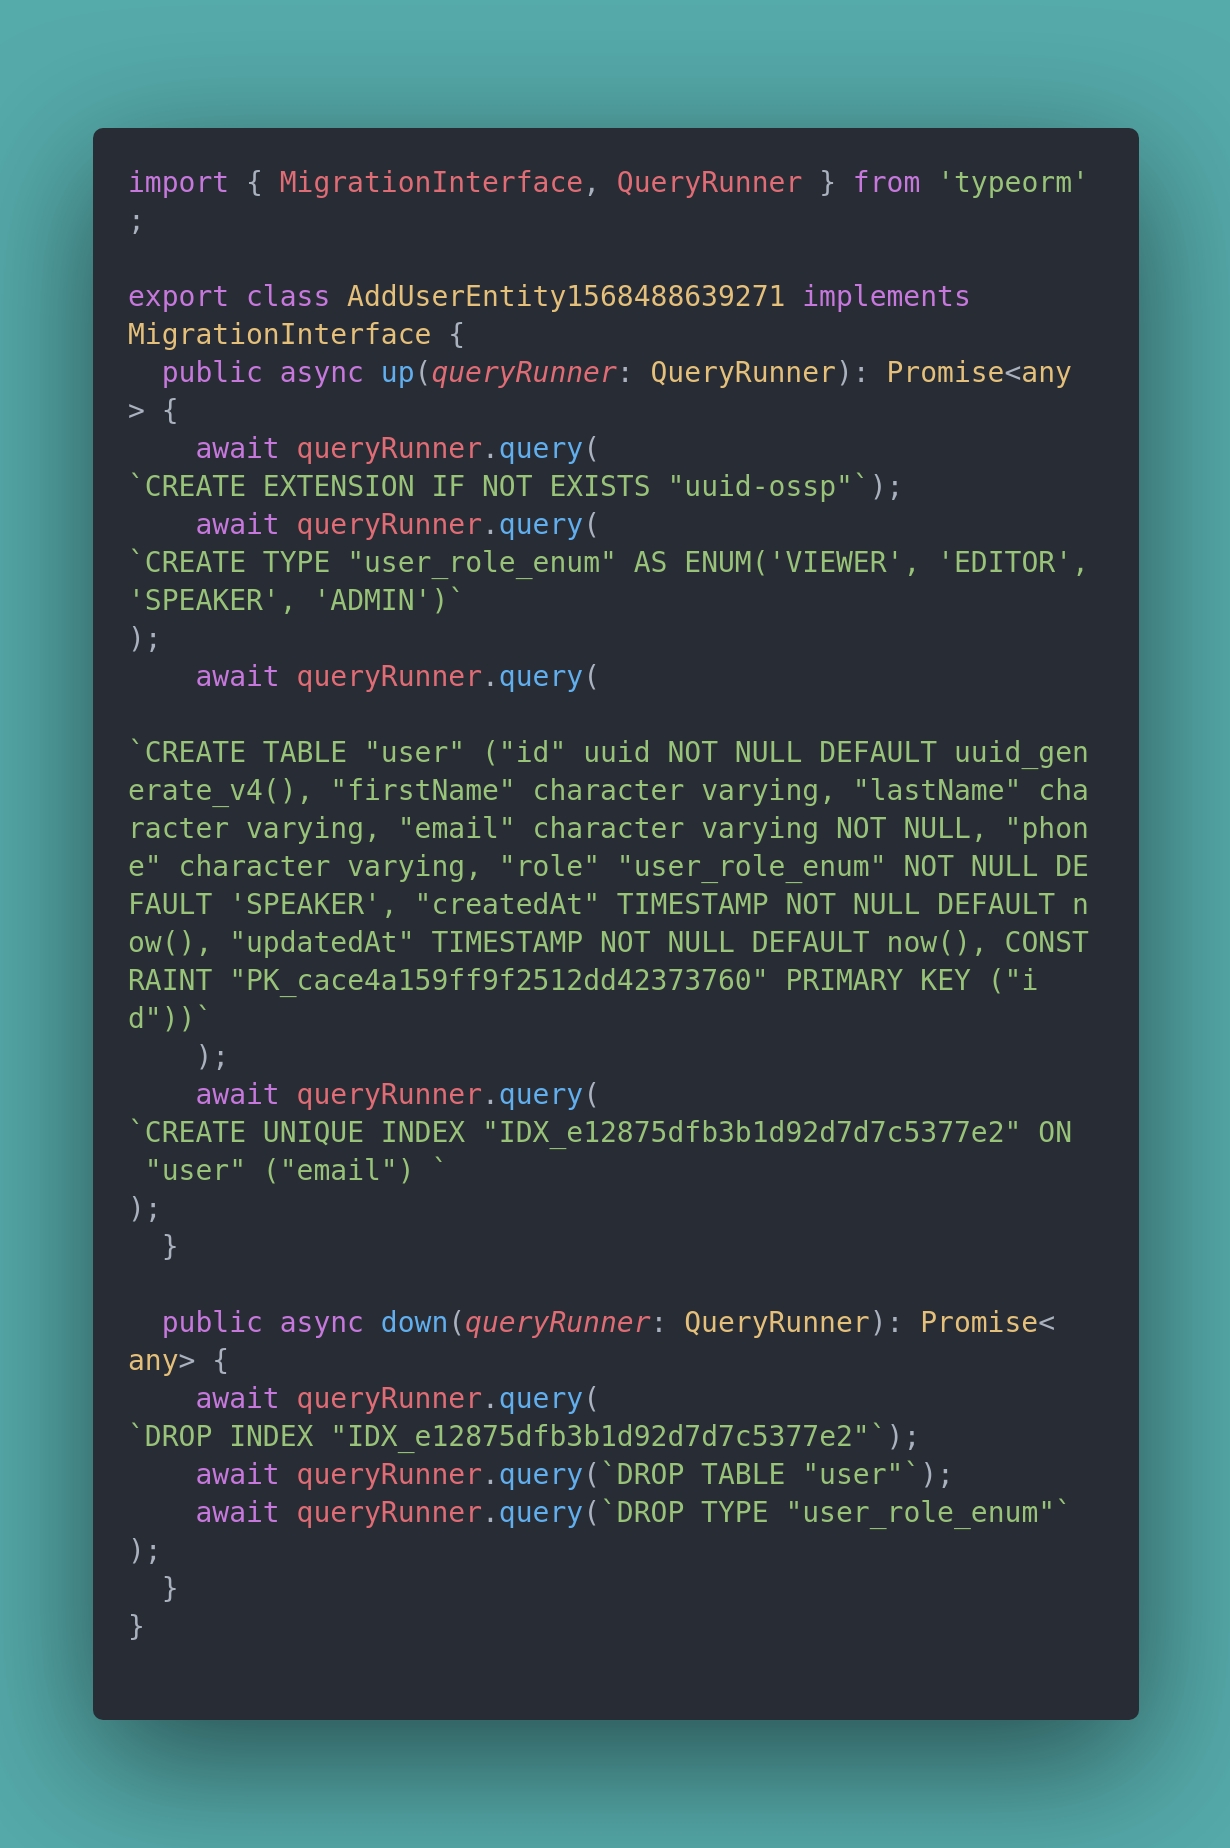
Great, we have a User Entity but what does all this code buy us? Let’s get back on track and run the other yarn script we created earlier yarn g:migration AddUserEntity. If everything ran successfully you'll see a new file under the root migrations folder that should look similar to below. There is one thing to note however, remember when I mentioned these migration files weren't always 100% perfect. Well, here is a perfect example. The Postgres extension for our UUID may not be installed but TypeORM has no way to know this when auto-generating this file. It simply compares the model we created to that in the database. To combat this we've added one more line to the up method await queryRunner.query(CREATE EXTENSION IF NOT EXISTS "uuid-ossp");. This will ensure when the migrations run we Postgres will install the needed extension.
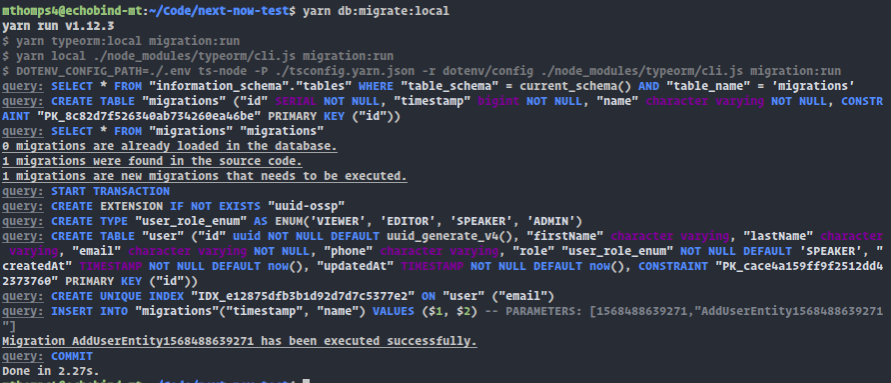
Everything looks good. Let’s run one more command. yarn db:migrate:local under the hood, this uses our custom typeorm:local setup and runs the typeorm command migrations:run. You should see an output similar to below and check Postgres to see that the user table was created.
Making Some Users
Alright, so far we’ve made our Entity, created and ran our Migrations, let’s get some Users into the database. While you could do this manually, we want to make this dynamic enough that others can get up and running as well. We’ll create a Factory and create a user seed file to create some users. Eventually, this Factory can also be used to test our users. Inside of our example codebase, you’ll see a folder for factories with the following code inside the UserFactory.
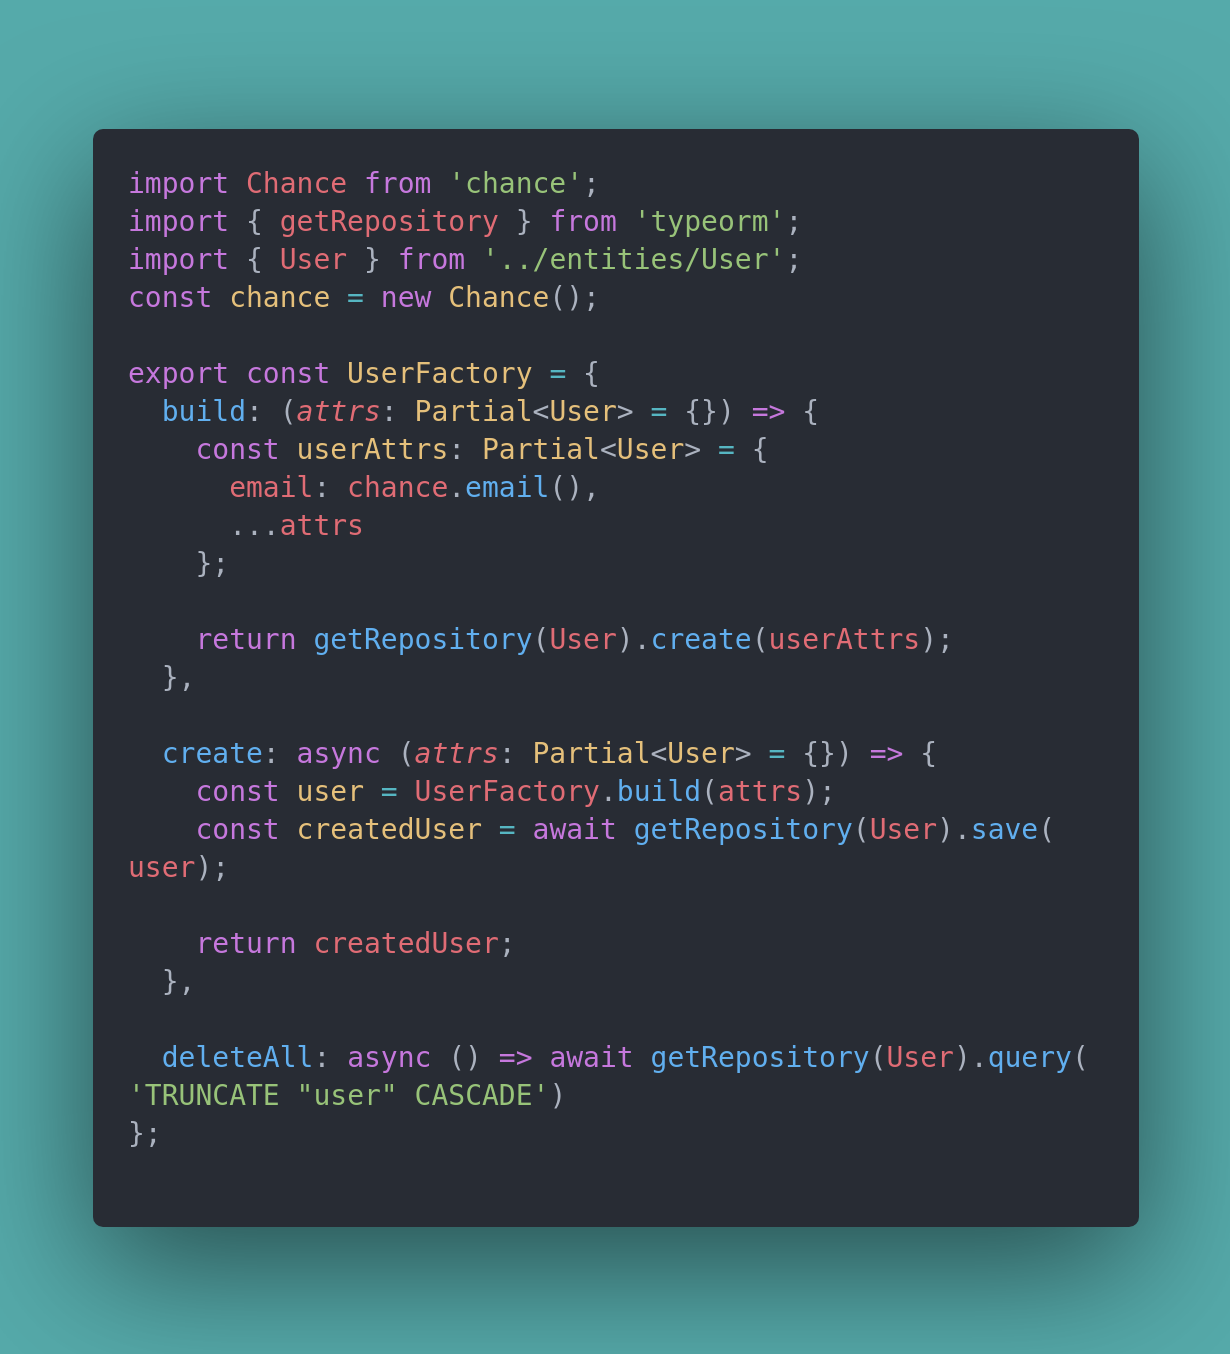
The big thing to note here is our build and create methods. With TypeORM you have the ability to create the record and validate it before we save it to the database. We know what record this will be by accessing the getReposiotry method and passing in our Entity. It's also worth noting TypeORM will add any of the default and null values missing from userAttrs. In this case, the only key required is email, we've used the chance library here to ensure one is always created but we can also pass other fields in to add to or overwrite our factory defaults. Now we can import this in a seed file and run our create method.
Example: UserFactory.create({firstName: 'Bob', email: 'bob@test.com'})
Adding more of these lines we can attempt to run this seed file within our yarn scripts and add some users. Feel free to be creative.
"db:seed:users": "yarn local seeds/userSeeds.ts"
Again, this will use our custom local config that points to the correct ENV credentials for TypeORM and runs our seed file. If everything ran successfully you should see some users in the Database!

Show Me Some Users!
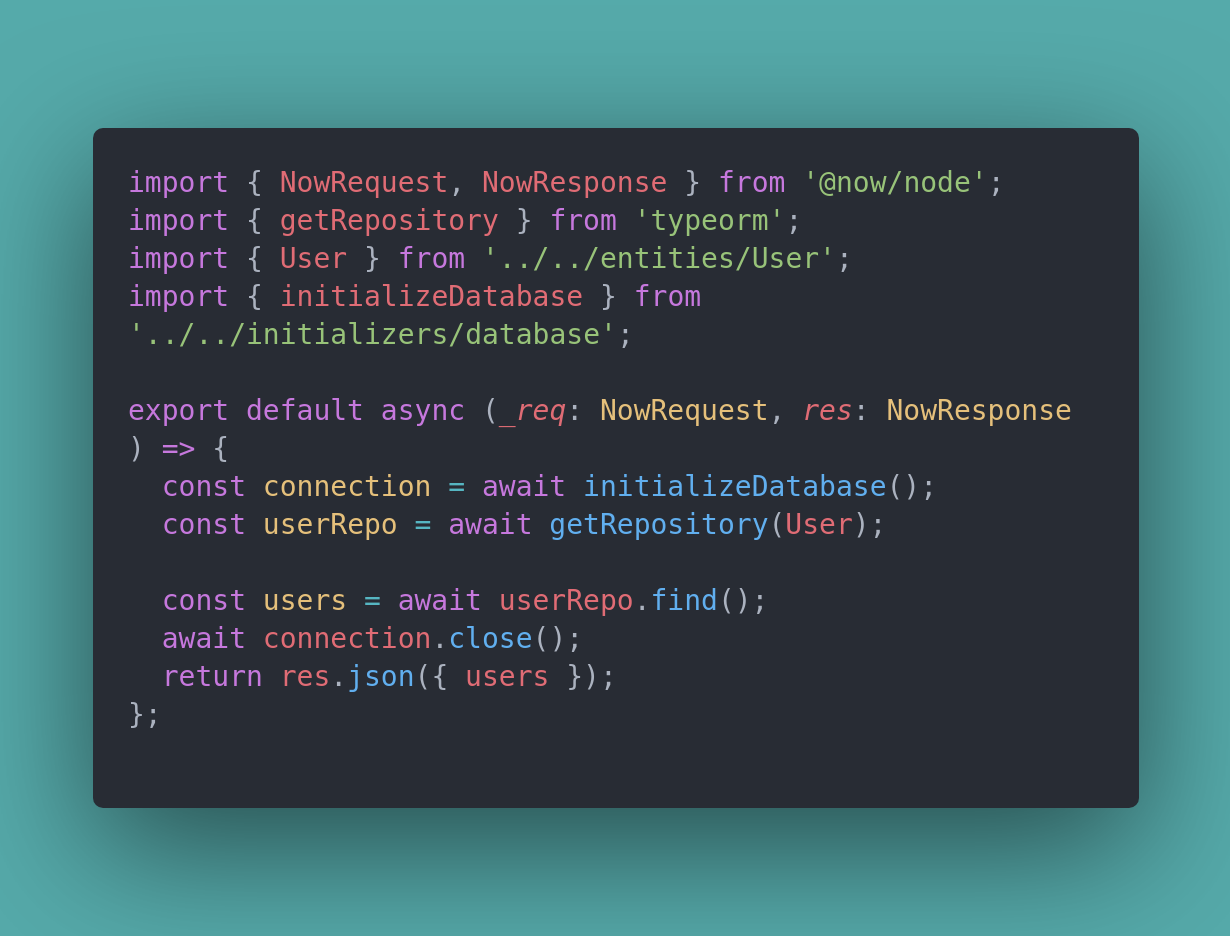
Nice, we’ve set up a lot of useful tools and got some users in the database, but data means nothing if we can’t view it. We are going to expand on Next.js REST API to get our Users. With Next.js, inside of the pages folder, their lies an api folder. This folder is used by Next.js to create endpoints dynamically based on the file names. In this example, we've made a getUsers file with the following. In the example here we are simply returning all users, importing our User Entity and the getRepository again we have access to the .find() method. We connect to our database, ensure we can find the entity and find the users returning them as a JSON Blob for our app. In the real world, you'll want to expand this for error handling but this works fine for now.
I’m sure you were wondering if we would ever get to this point, but let’s start up our app by running either now dev or yarn now:dev. Running our Next.js app with Now ensures our ENV's are compiled in properly. Once the app has started, navigate to localhost:3000/api/getUsers. You should have some data!

Fantastic! Let’s wrap this up and add some data to our home page. To do this we’ll use Reacts useState and useEffect hook to hit our API. Within our index page, we will add these lines.
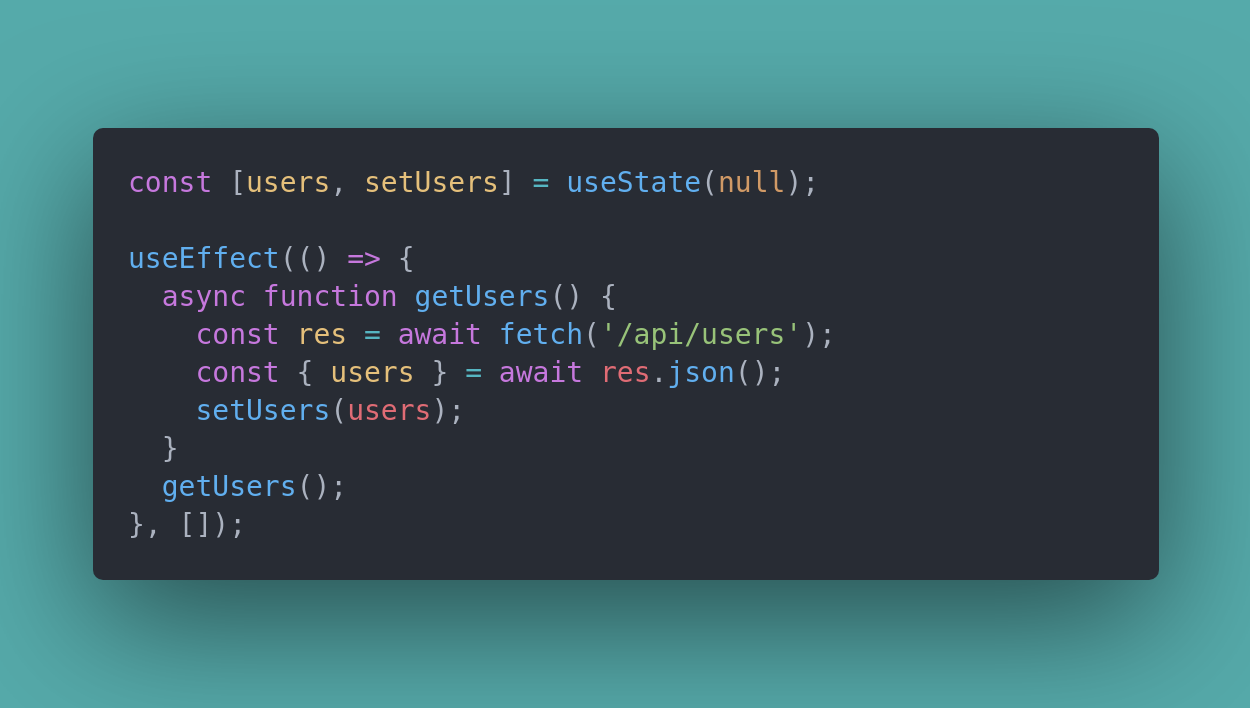
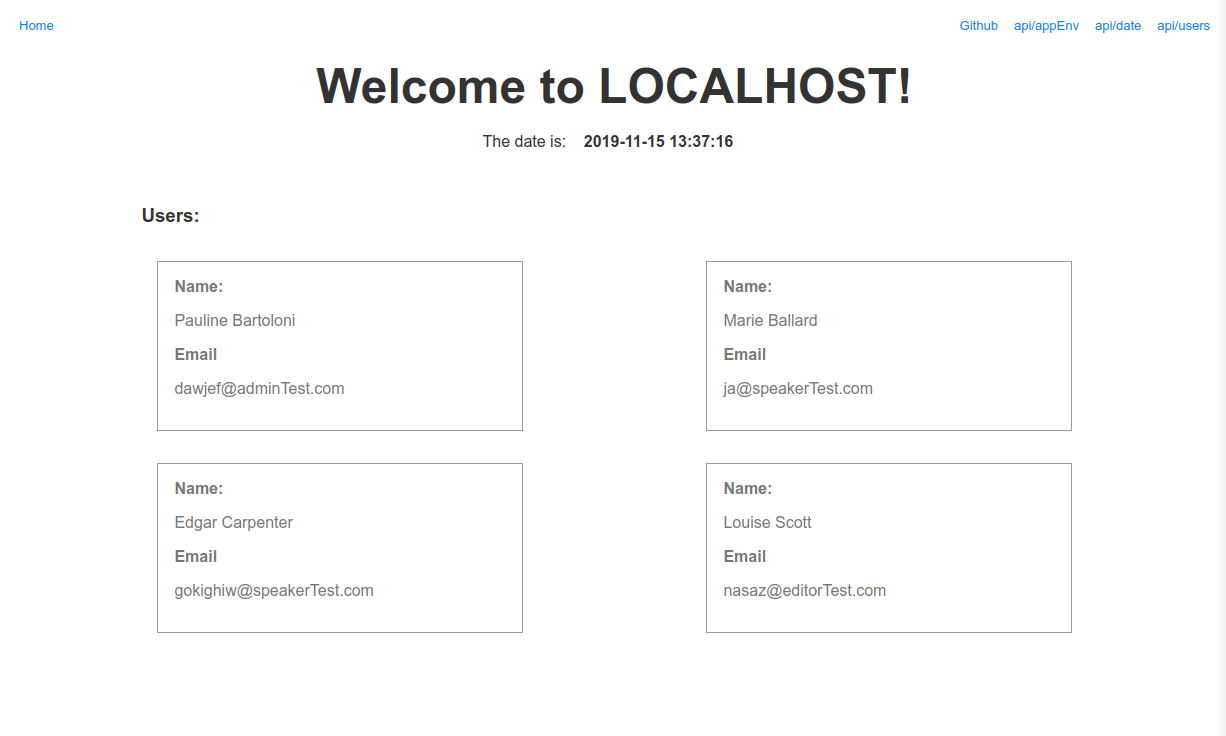
You should be able to map users and style however you’d like. With the app still running, navigate localhost:3000 and check out your results.
Wrapping up
A bit tedious but there you have it, a Next.js app up and running with TypeORM. The fun part, this is ready to go with our staging and production environments as well. Our different now.json files mentioned in the previous post will contain the ENV's needed to connect to the appropriate database for each. For seed files, you'll just need to dotenv in your yarn scripts to point to a proper env file. If you take a peek at the package.json file you'll see some examples where we've followed the same command:local pattern with :staging and :prod.
This setup is not contained to Next.js serverless REST pattern. There are various ways to set up a Next.js app. The good news, the TypeORM setup should remain the same. The Entities, Migrations, and Factory we created will not change. How you interact with them might. You may be looking to use Apollo and GraphQL. If so, you will look to call your getRepository and find() calls from within your resolvers.
I also mentioned at the beginning of this post it does not cover testing. There are still a few topics I’d like to cover regarding Next.js and Now. Namely testing your API with end-to-end tests, expanding on CI/CD, and Database pooling. Stay tuned, hopefully as I learn, so will you.


