The Graphcool Framework: A path to instant GraphQL greatness
Graphcool is a great service. We got a chance to put it through the paces on a recent React Native project, and I was impressed. Graphcool began as a GraphQL Backend-as-a-Service and recently released the (open source!) Graphcool Framework. The Graphcool Framework manages to bring an instant GraphQL backend to your local machine with minimal effort on your part. All you have to do is define the schema.
Running the Graphcool Framework locally enables you to easily manage your project and develop apps the way you’d develop anything else — using your favorite editor and git. When you’re ready to deploy, you can host the API yourself or use Graphcool’s hosted infrastructure.
Let’s take a look and see how easy it is to get going.
Setup
1. Install the graphcool cli: npm install -g graphcool. 2.Initialize a new Graphcool API. For smaller projects, it’s fine to use a subfolder in the main project. For larger projects, or projects that may have many different front-end clients, you’re better off using a separate git repo. In this example, we’re going to keep things separate.
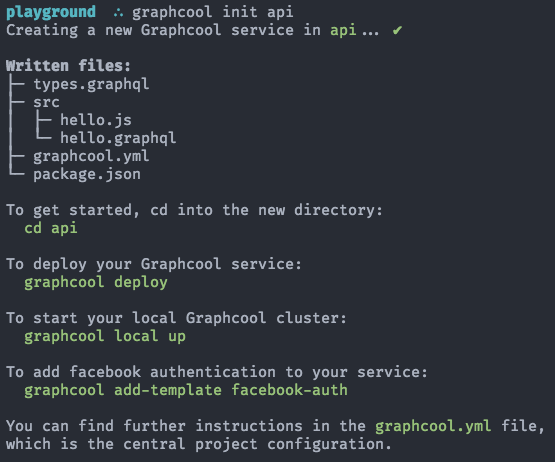
When it’s done, initialize a new git repo & commit the changes.
cd api
git init && git commit . -m “New Graphcool API"
Running Locally
Running Graphcool locally is optional, but doing so enables you to work anywhere: 🚂 ✈️ ⛺️ ⛱.
- Make sure you have Docker installed. Here’s a link for Mac. Other platforms are available under the “Get Docker” menu. If you don’t have Docker yet, you’ll see this when trying to start your local environment:

Oops, no Docker.
2. Start your local Graphcool service using graphcool local up. This will download a few different Docker images, so make sure you’re not tethering to your phone.
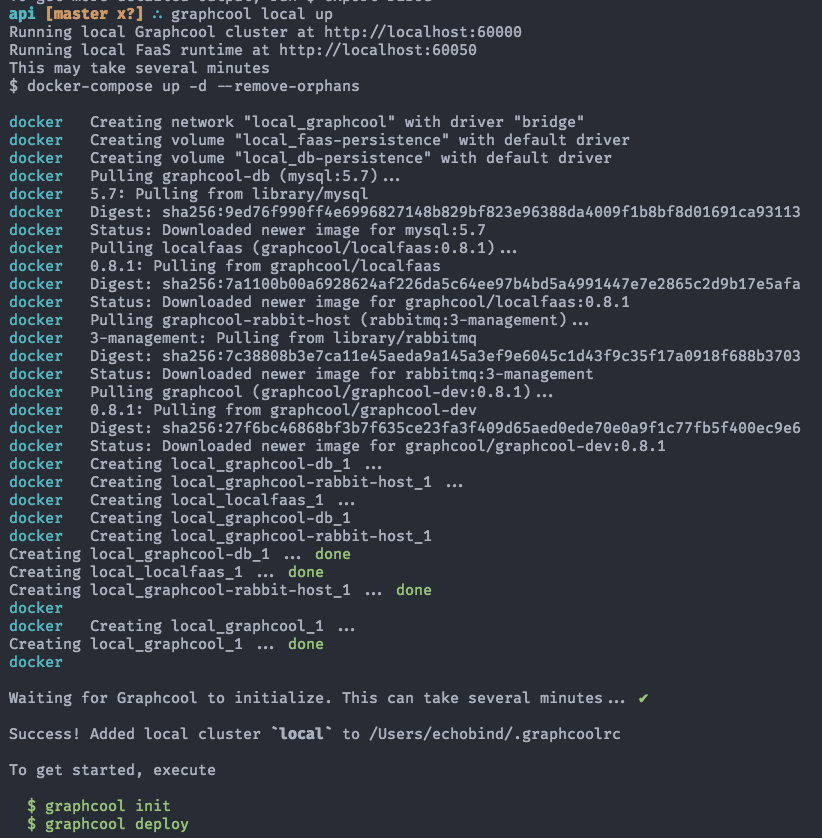
Installing local Graphcool Docker containers
3. Deploy those changes to the container using graphcool deploy. Doing this the first time will prompt for your default target (typically dev).
It will also prompt you for the location to deploy. For staging & production you’ll likely choose one of the “Shared Cluster” options, but we’re going to choose “local”.
If asked for the service name, just keep the default (api in our case).
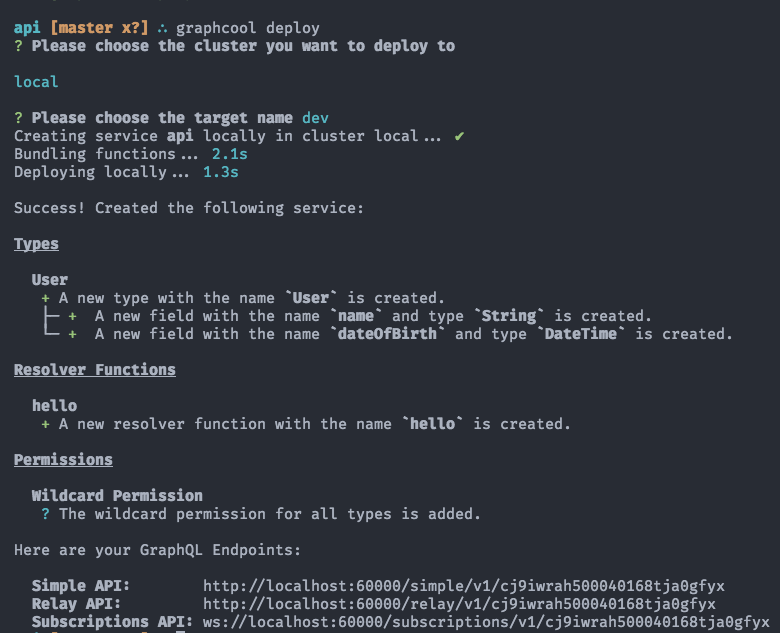
A successful Graphcool deploy!
Not only did Graphcool Framework configure everything for us, we also have a new User type ready for use. Graphcool uses this schema information to build us a CRUD API automatically.
Testing it out
If you’re not familiar with GraphiQL, it is an in-browser IDE for GraphQL that allows you to inspect your schema and try out queries, mutations, and subscriptions. GraphiQL is built-in to Graphcool (it’s is called the playground internally).
Since GraphiQL knows about the entire schema, you get some pretty great autocomplete features. To open it up, just use graphcool playground.
Let’s make sure we can properly query Users:
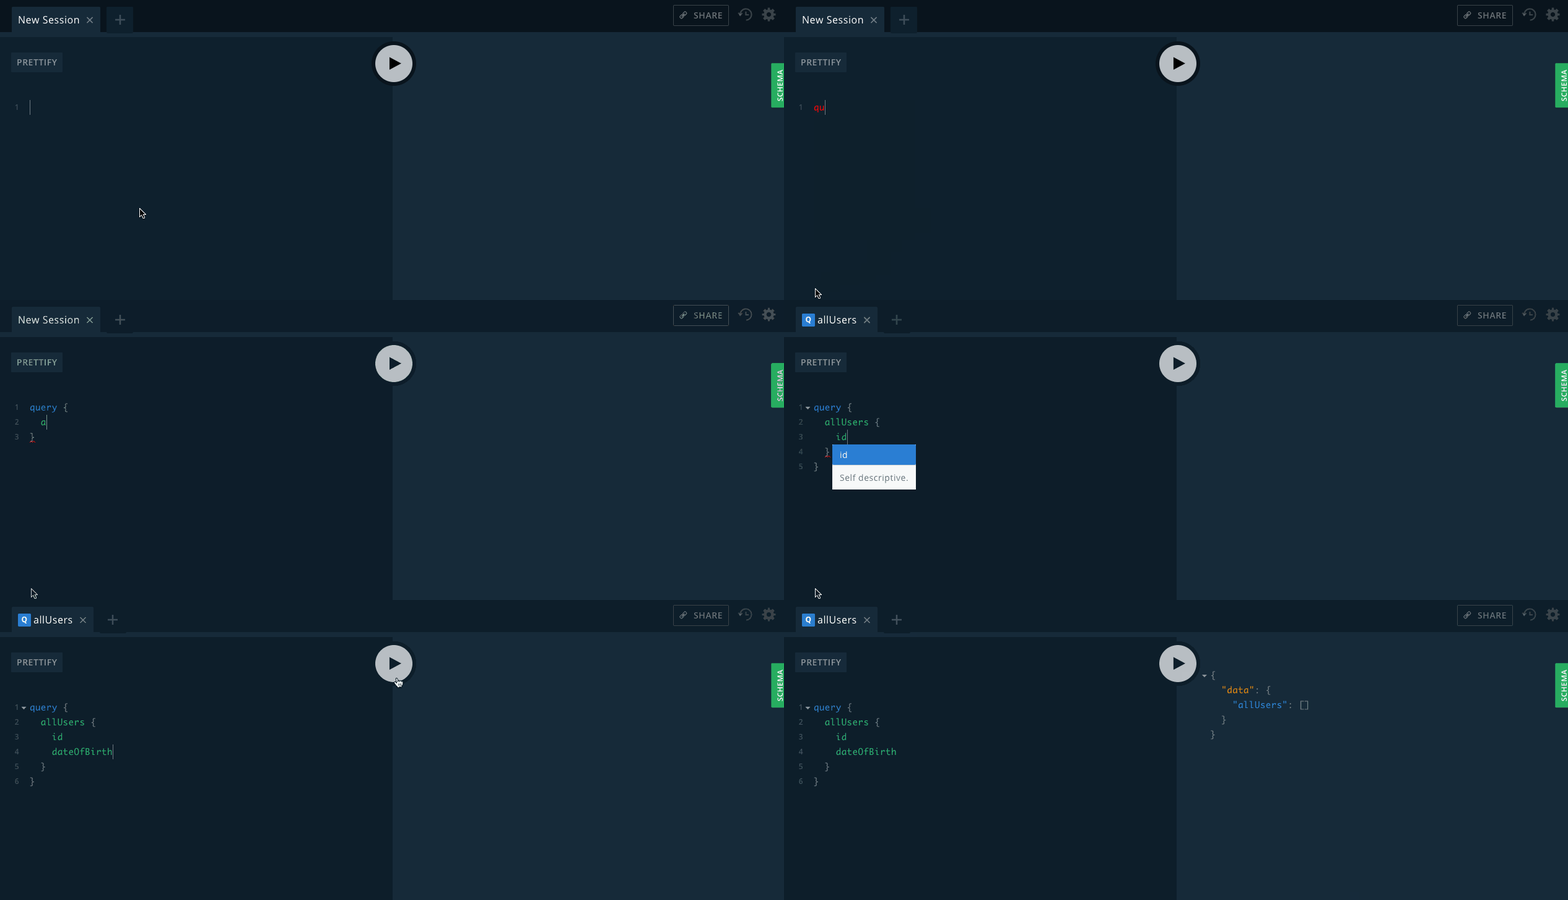
And create them:
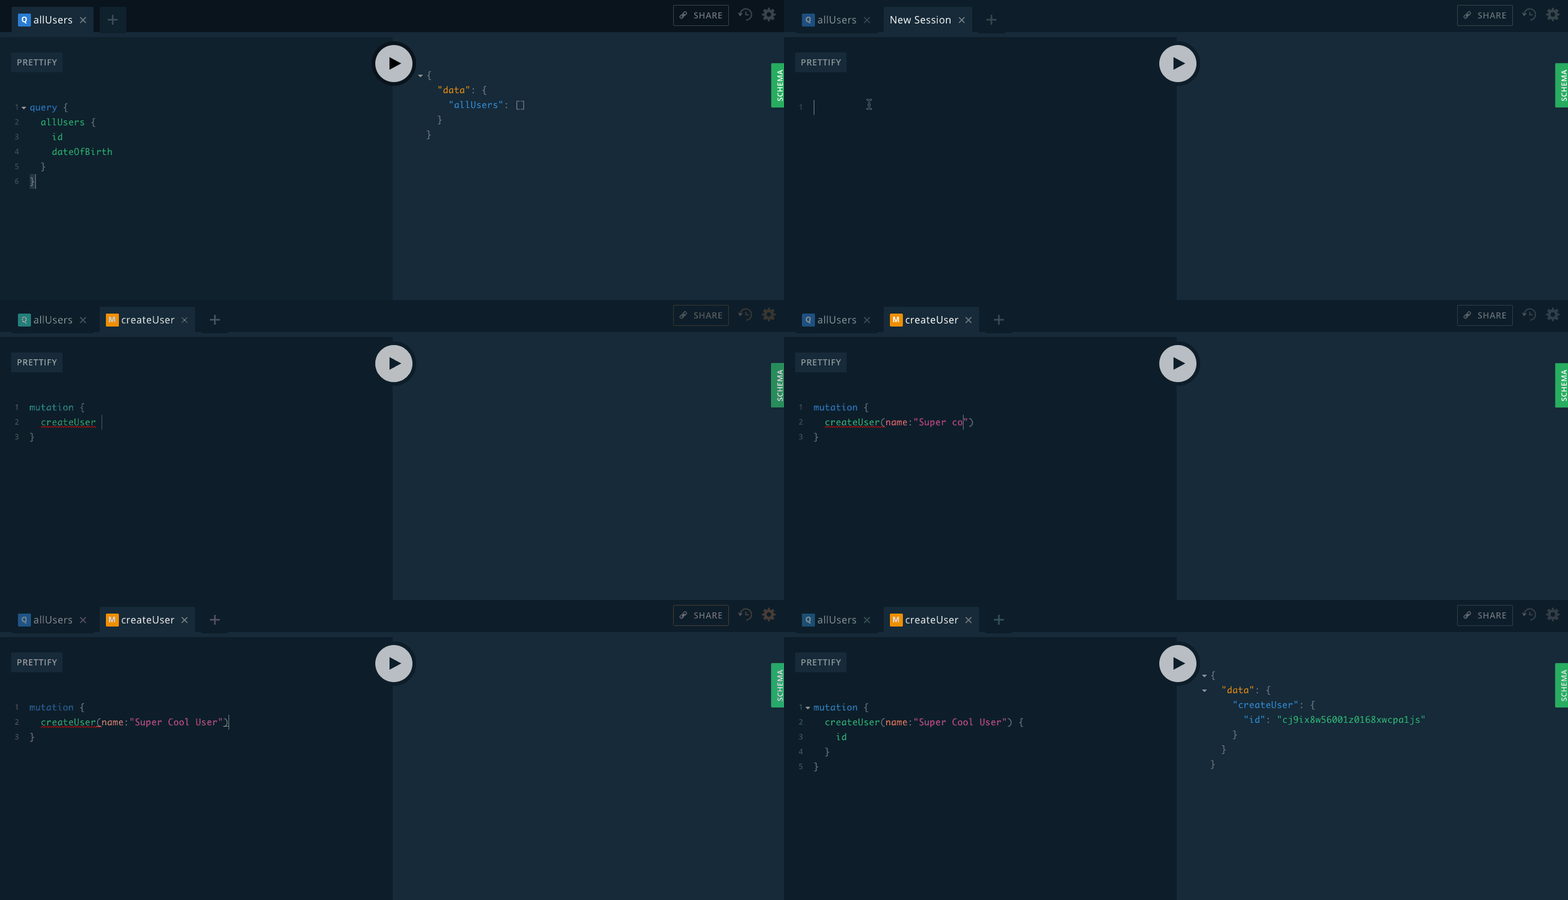
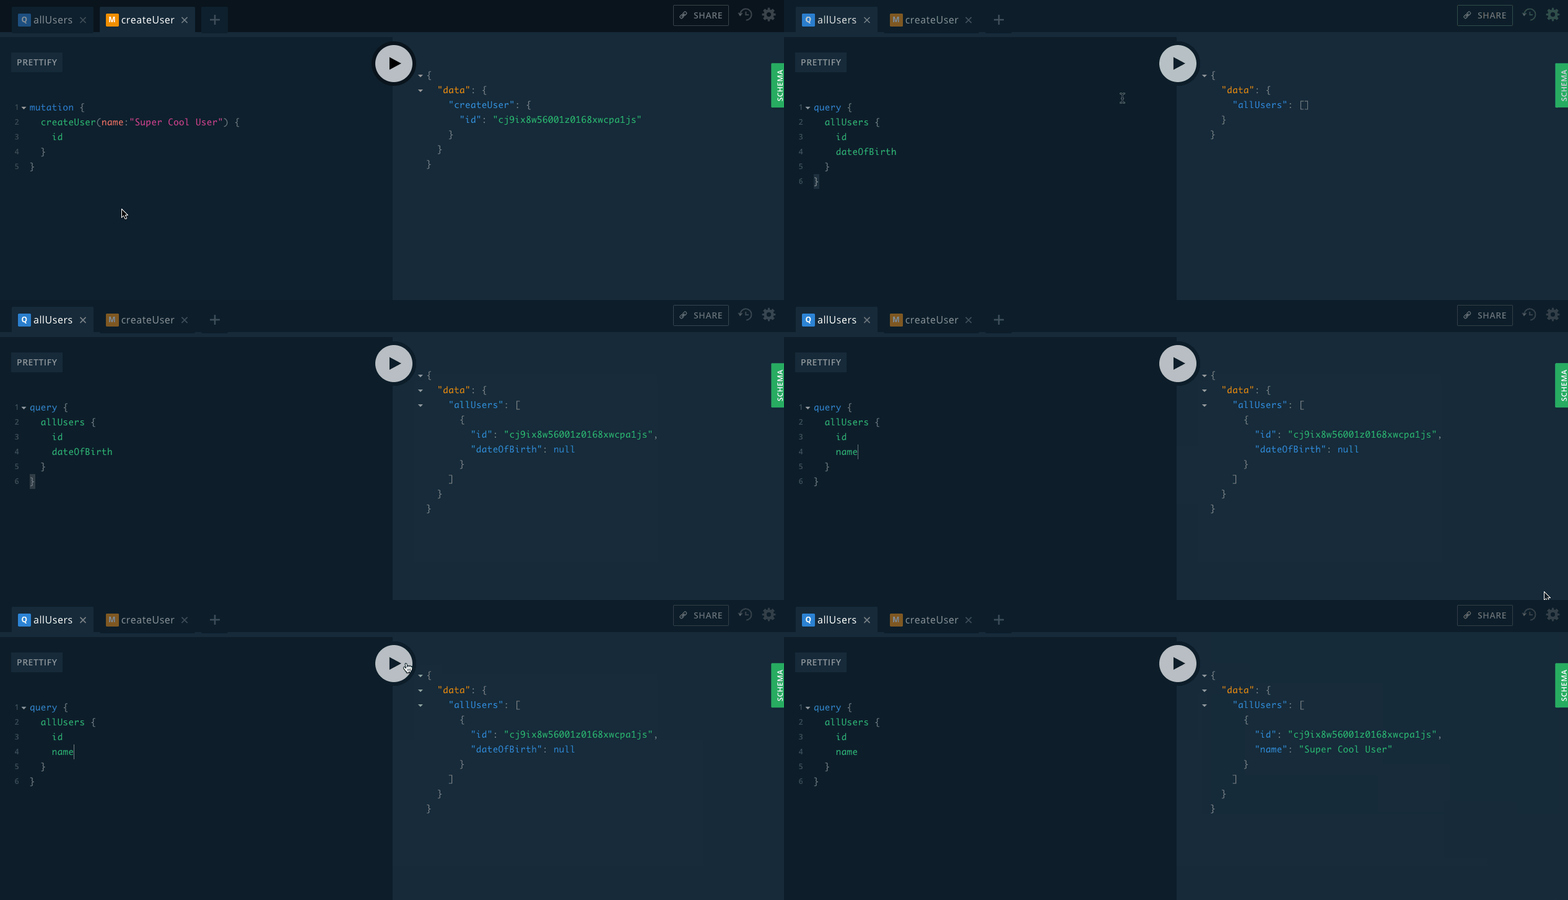
If we go back to our allUsers query, we can see that things have persisted and we’re good to go.
If you want to see detailed information about your schema, just use the green schema tab on the right of the screen.
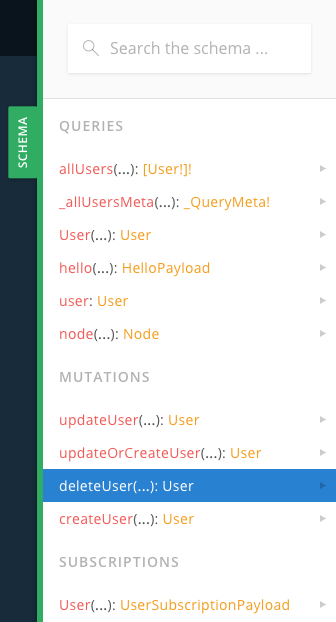
We get a lot for free!
Custom Functions
Automatic CRUD operations are great, but custom functions are some next level awesomeness. Graphcool has 3 types of custom functions available.
- Hooks
- Subscriptions
- Resolvers
Let’s check our custom resolver function that was added by graphcool init:
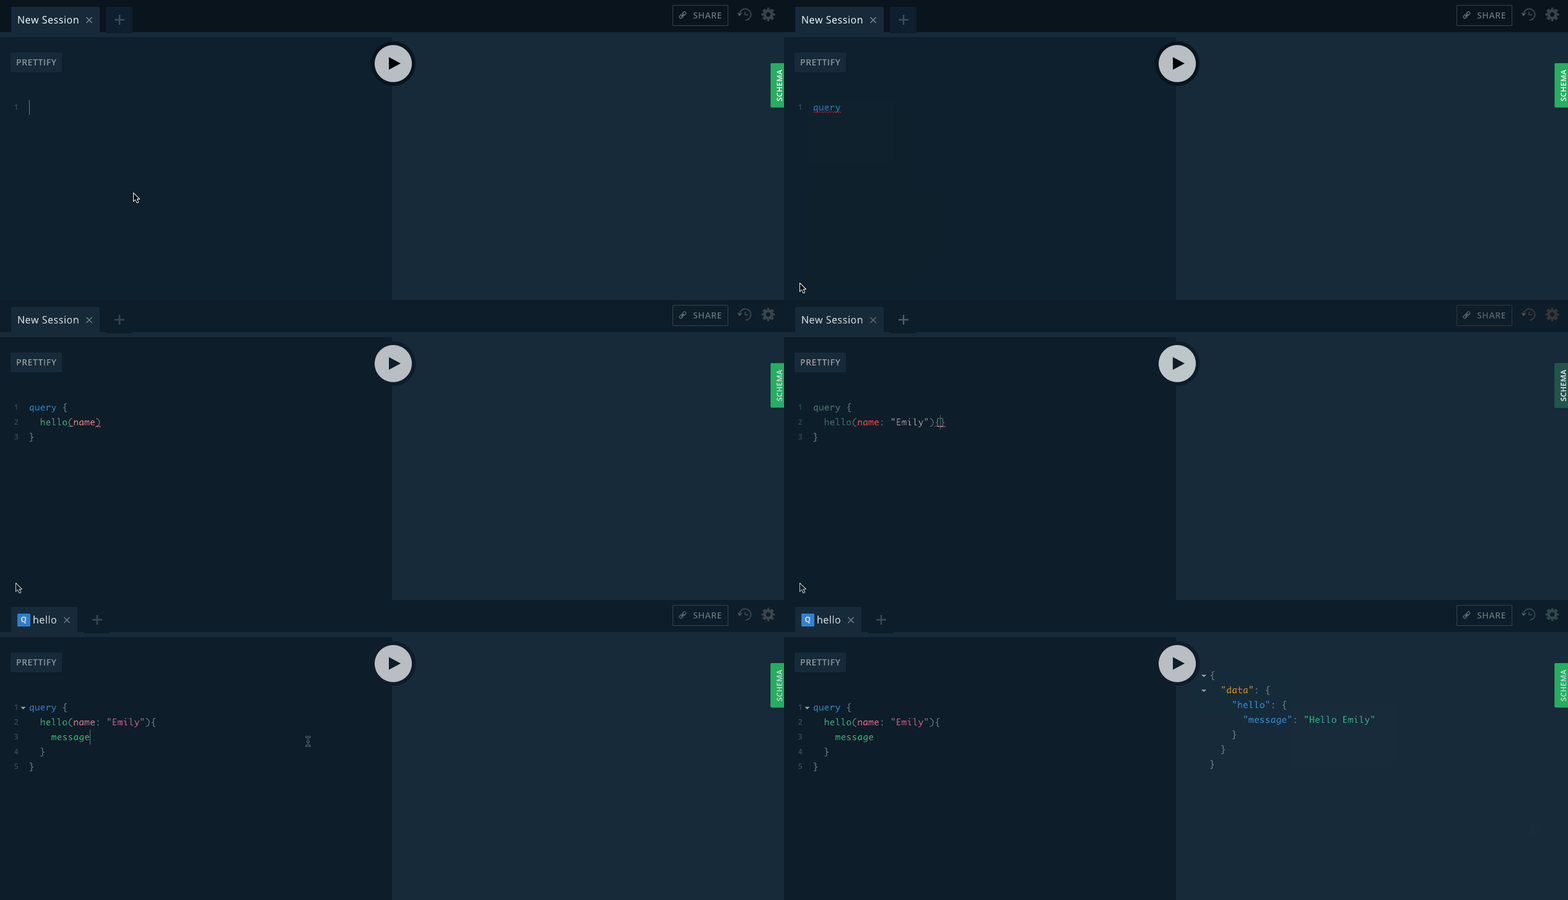
Testing out the default hello function
Define a custom function
Let’s assume for some reason, we want to give users a default dateOfBirth if one is not provided. We can leverage Graphcool’s operationBefore hook for that.
Add the definition to our graphcool.yml file. We’ll tell Graphcool to run the setBirthDate function before a User is created:
functions:
  hello:
    handler:
      code: src/hello.js
    type: resolver
    schema: src/hello.graphql

  setBirthDate:
    handler:
      code: src/setBirthDate.js
    type: operationBefore
    operation: User.create
If you want to remove sensitive information from the return payload, there’s a corresponding operationAfter type.
Create the function
- First, create the function to run. Make sure and name the file using the same path you specified in
graphcool.yml.
export default async event => {
  const data = { ...event.data };

  data.dateOfBirth = data.dateOfBirth || new Date(1999, 1, 1);

  return {
    data
  };
};
Deploying our changes
For your local Graphcool server to reflect these changes, just run graphcool deploy again.
Running our createUser mutation again, shows that the user does get a dateOfBirth properly set to party like its 1999.

Webhooks
There two ways to handle custom functions using Graphcool. We’ve already used the first, which runs a function local to the server. The other option (which is great for integrating with existing systems) is to use a webhook.
First, we define the webhook in graphcool.yml just like we defined setBirthDate.
For this example, I’ve set up a demo Heroku app that returns some mock data.
functions:
  hello:
    handler:
      code: src/hello.js
    type: resolver
    schema: src/hello.graphql

  setBirthDate:
    handler:
      code: src/setBirthDate.js
    type: operationBefore
    operation: User.create

  queryLegacySystem:
    type: resolver
    schema: src/queryLegacySystem.graphql
    handler:
      webhook:
        url:  https://vast-eyrie-90387.herokuapp.com/
        headers:
          Content-Type: application/json
If you want to set up a local server to test the webhook, here’s the express code we’re using:
const express = require('express')
const app = express()
app.use(express.json());

const data = [{"id":1,"first_name":"Martainn","last_name":"Moorwood","email":"mmoorwood0@blogger.com","gender":"Male","ip_address":"52.105.79.153","location":{"city":"Cincinnati","state":"Ohio"}},
{"id":2,"first_name":"Shannan","last_name":"Jakubovitch","email":"sjakubovitch1@biglobe.ne.jp","gender":"Male","ip_address":"57.51.60.154","location":{"city":"Charlotte","state":"North Carolina"}},
{"id":3,"first_name":"Alyson","last_name":"Itzkowicz","email":"aitzkowicz2@twitter.com","gender":"Female","ip_address":"210.162.183.75","location":{"city":"Chicago","state":"Illinois"}},
{"id":4,"first_name":"Lalo","last_name":"Ference","email":"lference3@elegantthemes.com","gender":"Male","ip_address":"61.254.152.136","location":{"city":"Reading","state":"Pennsylvania"}},
{"id":5,"first_name":"Creight","last_name":"McGeaney","email":"cmcgeaney4@senate.gov","gender":"Male","ip_address":"121.9.2.0","location":{"city":"Las Vegas","state":"Nevada"}},
{"id":6,"first_name":"Anabel","last_name":"Dutnall","email":"adutnall5@artisteer.com","gender":"Female","ip_address":"174.237.252.181","location":{"city":"Melbourne","state":"Florida"}},
{"id":7,"first_name":"Chicky","last_name":"Rustadge","email":"crustadge6@blog.com","gender":"Male","ip_address":"240.115.81.219","location":{"city":"Merrifield","state":"Virginia"}},
{"id":8,"first_name":"Janette","last_name":"Duval","email":"jduval7@springer.com","gender":"Female","ip_address":"231.173.106.49","location":{"city":"Fairbanks","state":"Alaska"}},
{"id":9,"first_name":"Eran","last_name":"Beddin","email":"ebeddin8@ted.com","gender":"Female","ip_address":"165.190.138.171","location":{"city":"Independence","state":"Missouri"}},
{"id":10,"first_name":"Gilberte","last_name":"Bratcher","email":"gbratcher9@pinterest.com","gender":"Female","ip_address":"250.227.243.236","location":{"city":"Brooklyn","state":"New York"}},
{"id":11,"first_name":"Courtnay","last_name":"Trenoweth","email":"ctrenowetha@bandcamp.com","gender":"Male","ip_address":"35.163.119.198","location":{"city":"Washington","state":"District of Columbia"}},
{"id":12,"first_name":"Kalila","last_name":"Pinock","email":"kpinockb@gravatar.com","gender":"Female","ip_address":"173.250.231.15","location":{"city":"Bronx","state":"New York"}},
{"id":13,"first_name":"Gerrard","last_name":"Meakes","email":"gmeakesc@miitbeian.gov.cn","gender":"Male","ip_address":"253.174.49.32","location":{"city":"Des Moines","state":"Iowa"}},
{"id":14,"first_name":"Kiley","last_name":"Honnan","email":"khonnand@prlog.org","gender":"Male","ip_address":"49.50.71.136","location":{"city":"Chula Vista","state":"California"}},
{"id":15,"first_name":"Susan","last_name":"Fetherston","email":"sfetherstone@prnewswire.com","gender":"Female","ip_address":"186.238.114.230","location":{"city":"Orlando","state":"Florida"}},
{"id":16,"first_name":"Ilysa","last_name":"Hutchinges","email":"ihutchingesf@slideshare.net","gender":"Female","ip_address":"58.121.6.64","location":{"city":"Harrisburg","state":"Pennsylvania"}},
{"id":17,"first_name":"Merrilee","last_name":"Coppledike","email":"mcoppledikeg@google.co.uk","gender":"Female","ip_address":"59.43.136.210","location":{"city":"Springfield","state":"Illinois"}},
{"id":18,"first_name":"Codi","last_name":"Moreinis","email":"cmoreinish@ebay.co.uk","gender":"Female","ip_address":"243.138.168.112","location":{"city":"Harrisburg","state":"Pennsylvania"}},
{"id":19,"first_name":"Gilles","last_name":"Behrendsen","email":"gbehrendseni@simplemachines.org","gender":"Male","ip_address":"168.119.83.215","location":{"city":"Mansfield","state":"Ohio"}},
{"id":20,"first_name":"Hinda","last_name":"Crabbe","email":"hcrabbej@skype.com","gender":"Female","ip_address":"0.84.221.30","location":{"city":"Denver","state":"Colorado"}}]

app.post('/', function (req, res) {
  console.log(req.body)
  res.send({ data: { users: data }});
})

app.listen(3000, function () {
  console.log('Example app listening on port 3000!')
})
When testing out webhooks of any kind, it’s a good idea to use ngrok to tunnel a publicly accessible https url back to your local machine.
Finally, create the schema file at the path you specified in graphcool.yml above. There’s no need to add a JavaScript file since we’re calling a webhook instead.
type LegacySystemPayload {
  users: Json
}

extend type Query {
  queryLegacySystem(userId: ID!): LegacySystemPayload
}
Run graphcool deploy and let’s try it out.
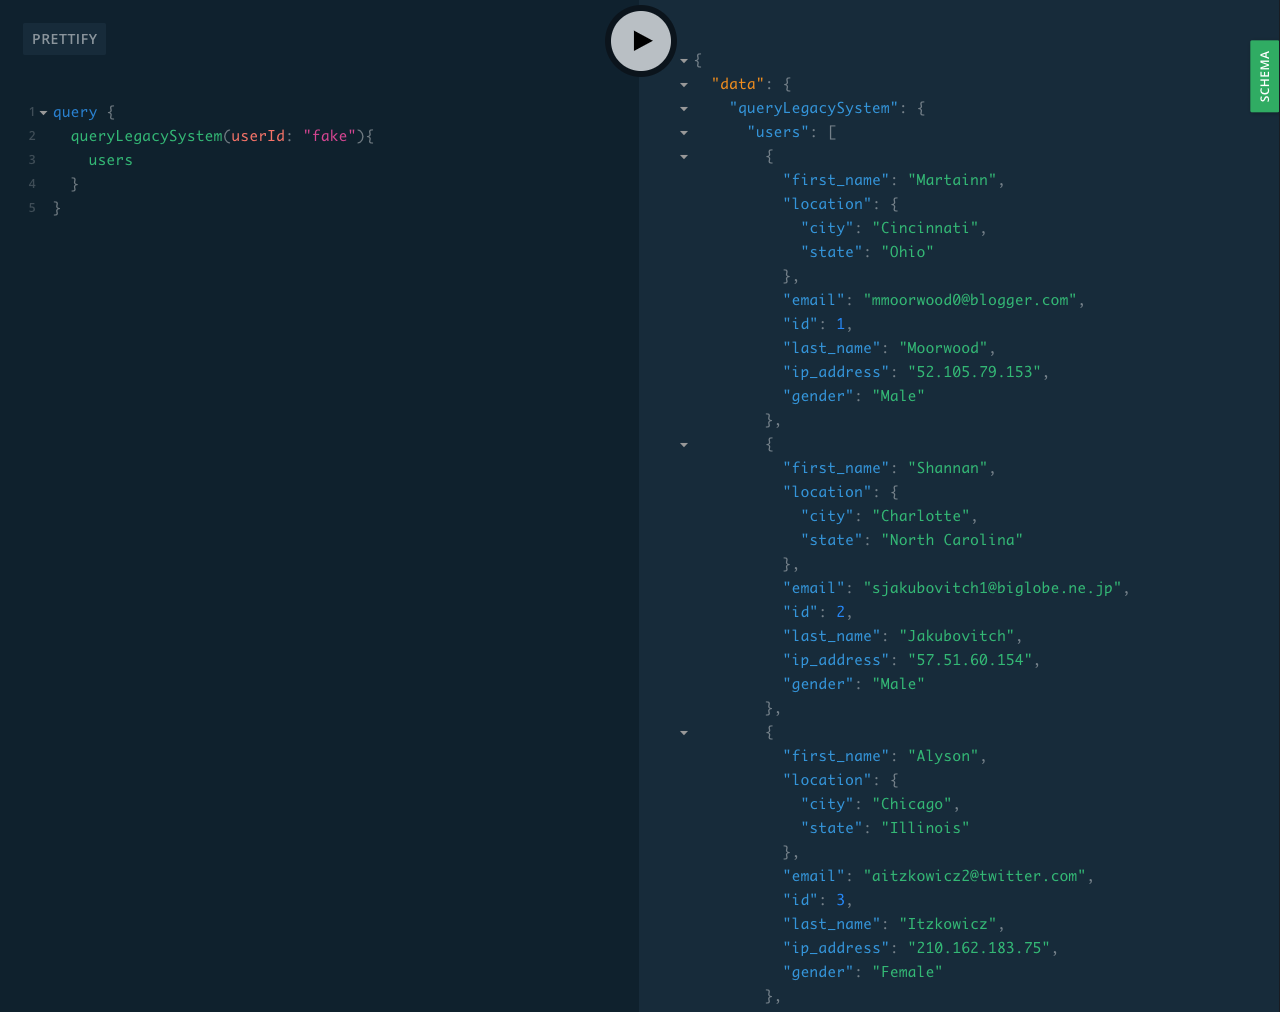
There’s one slight gotcha to keep in mind. The response from your existing server needs to be wrapped in a top level data key to be recognized by GraphQL.
Staging & Production Environments
We’re off and running with a dev environment, but what about staging and production? Turns out that’s easy! Just use the --target (or -t) option available to most cli commands.
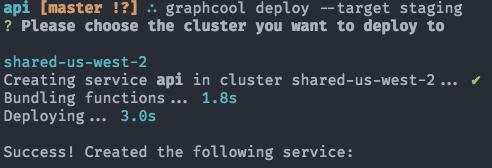
Creating a new staging environment
There’s a Graphcool in your CI!
In a follow up article, we’ll take a look at how to run Graphcool inside a CI service to enable true E2E testing of a React Native app.
The good news for now is that syncing up Graphcool staging deploys with your CI process is pretty painless. It works like this:
npm install -g graphcool- run tests
graphcool deploy -t staging
Bonus
By the way, if you have an error in your functions along the way, you get wonderful little error messages when trying to deploy. This combined with graphcool logs makes debugging issues pretty painless.

Nice, informative error messages
Recommended links for additional reading:
graphcool-lib examples
Permission rules examples
Wrapping an existing REST API
Graphcool Reference Docs
Update 11/17/17: Removed setBirthDate.graphql as it’s not required for operationBefore hooks.


