How to Easily Create Custom Skills for Alexa
After another influx of Alexa powered devices made their way into consumer homes, many companies hope to create custom skills. We’ve had the opportunity to help integrate custom business logic that will keep our clients top of mind, and you can too.
The Amazon documentation is very straightforward, so we made a tutorial to help create custom skills that involve linking your user’s Amazon account with their profile on your application.
Throughout this article, you will learn the process of creating a custom skill, linking it with a user in a Rails application (using Devise and Doorkeeper), and querying data on the user’s behalf.
If that sounds like fun, let’s get started!
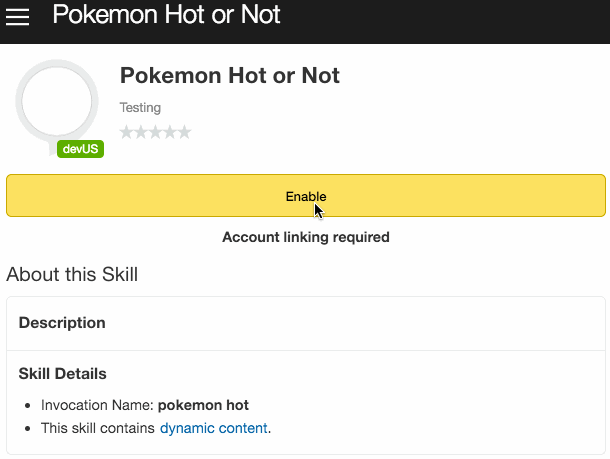
Meet our application: PokeHOT or PokeNOT

I have had the pleasure of working with the premiere Pokemon hotness rating application on the Internet today. It’s very disruptive. Thankfully, this author was kind enough to let me use their application as an example of writing custom Alexa skills. This is a basic application that allows a user to sign in, vote on the hottest Pokemon, and see the results.
For our Alexa skill, we will enable a user to:
- link their account
- check which Pokemon is currently the hottest
- ask for the last vote they cast on a Pokemon
All by using their voice!
Step one: Get an Amazon Developer Account and create a Custom Skill in Alexa
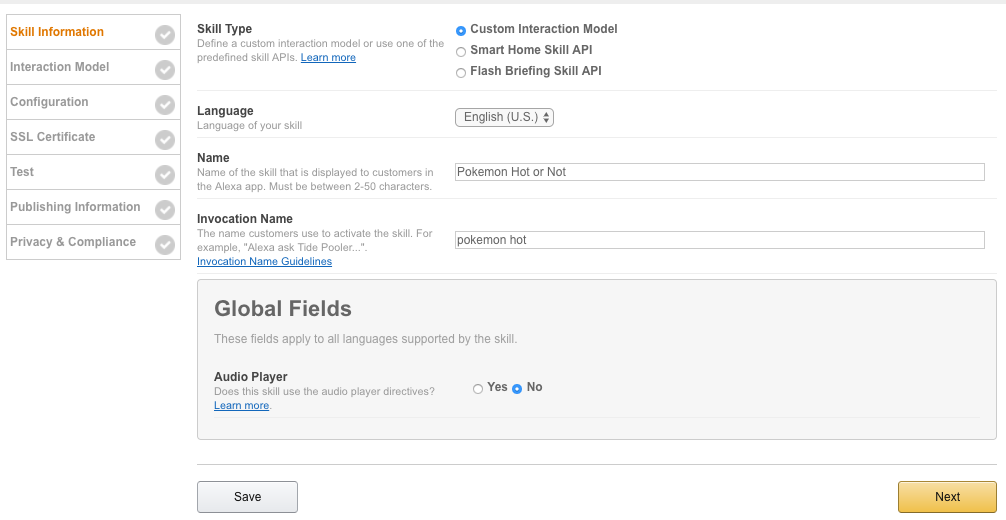
Sign up for a developer account on Amazon, click on the Alexa Tab, then Alexa Skills Kit. Once in the Alexa skills dashboard, click on the “Add a new Skill” button.
Let’s go through the new skill sections one-by-one.
Skill Information: This is where you put basic info like your skill name, invocation name, etc. All we do here is put “Pokemon Hot or Not” for skill name, and “Pokemon hot” for the invocation name.
Note: the invocation name is what users say to ask questions through your skill.
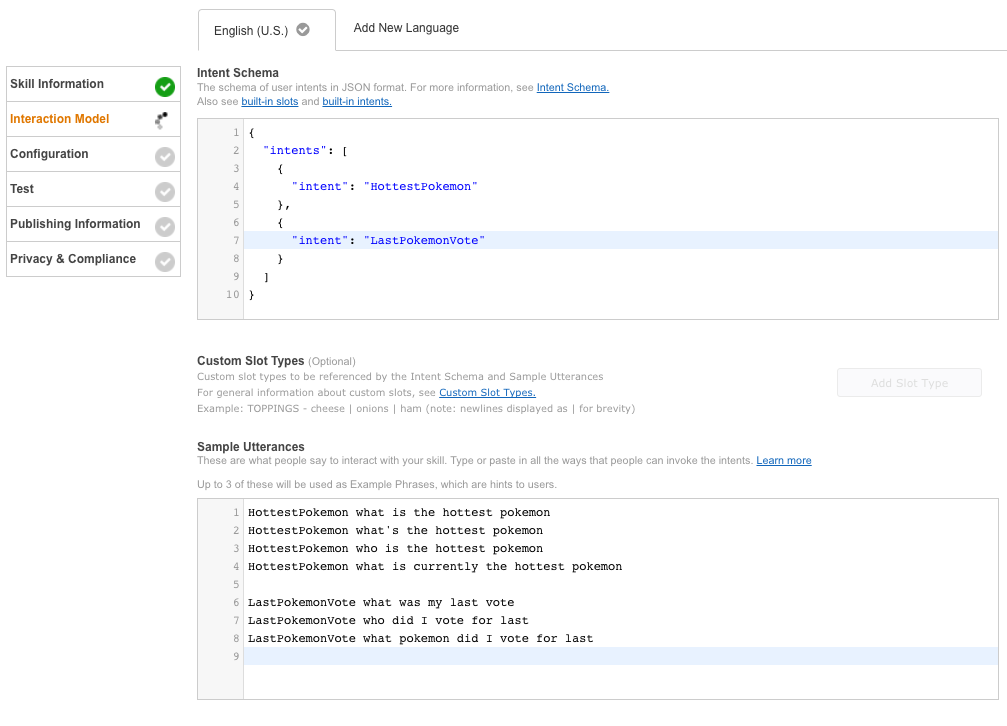
Interaction Model: Place your “Intent Schema” and your “Sample Utterances” here. In short, your Intent Schema is the list of intents you want for your skill. An “Intent” is basically a question. We are going to keep this part simple with only a couple intents. For more information on intents, see this section of the Alexa documentation. We will also add some sample utterances on this page. An utterance is an example of how your user can ask a question. You will generally want a lot of sample utterances in your skill.
Let’s leave the rest of the skill configuration blank for now. We’ll come back to the configuration after we’ve set up our application to talk to Amazon. For now, take a break, grab a coffee, and rest up. You’ve done a lot.
Step Duex: Setting up your application to talk with Alexa
Let’s set up our application to handle Alexa’s requests. For this section, we’re going to assume you have a Rails API available.
Create a new controller for requests from Alexa
Alexa will hit our server with POST requests. These requests will contain data, like an access token, Intent name, etc. In order to get these requests, let’s create a new controller. I like to namespace mine, so I opt for api/alexa/handler_controller.rb
In this controller, you’ll note that I return an odd piece of JSON. A lot of this is boilerplate you need for Amazon. The most important part is the “outputSpeech” section. Here is the documentation to learn more about responses and requests from Amazon. For now, we’ll stub out a simple response “hello from Pokemon Hot!”
#app/controllers/api/alexa/handlers_controller.rb
class Api::Alexa::HandlersController < ActionController::Base
  def create
    message = "hello from Pokemon Hot!"
    session_attributes = {"previous_session": "something"}
    session_end = true

    render json: {
      "response": {
        "outputSpeech": {
          "type": "PlainText",
          "text": message,
        },
        "shouldEndSession": session_end
      },
      "sessionAttributes": session_attributes
    }
  end
end
and update your routes file
#config/routes.rb
  namespace :api do
    namespace :Alexa do
      resource :handler, only: [:create]
    end
  end
Once you’re finished make sure to restart your Rails server.
Install ngrok for SSL locally
ngrok will host a local version of our ap, and allow Amazon servers to speak to it. Amazon requires our server to have SSL. We don’t want to host a heroku SSL instance simply for testing, so ngrok will work perfectly.
brew update
brew cask install ngrok
After installing ngrok, set it to run on whatever port you’re running your Rails server on. In our case, it’s good ol’ port 3000.
ngrok http 3000
After running this command, you should see something like this:
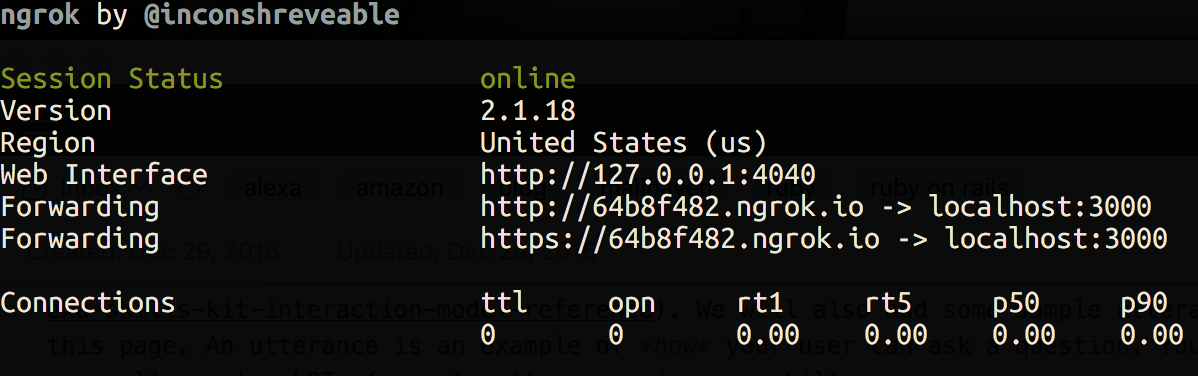
Do you see that https link above? That is what we’ll tell Alexa to communicate with.
Get Alexa to talk to us
Now that we have:
- ngrok tunneling our application to https
- we have our controller and route
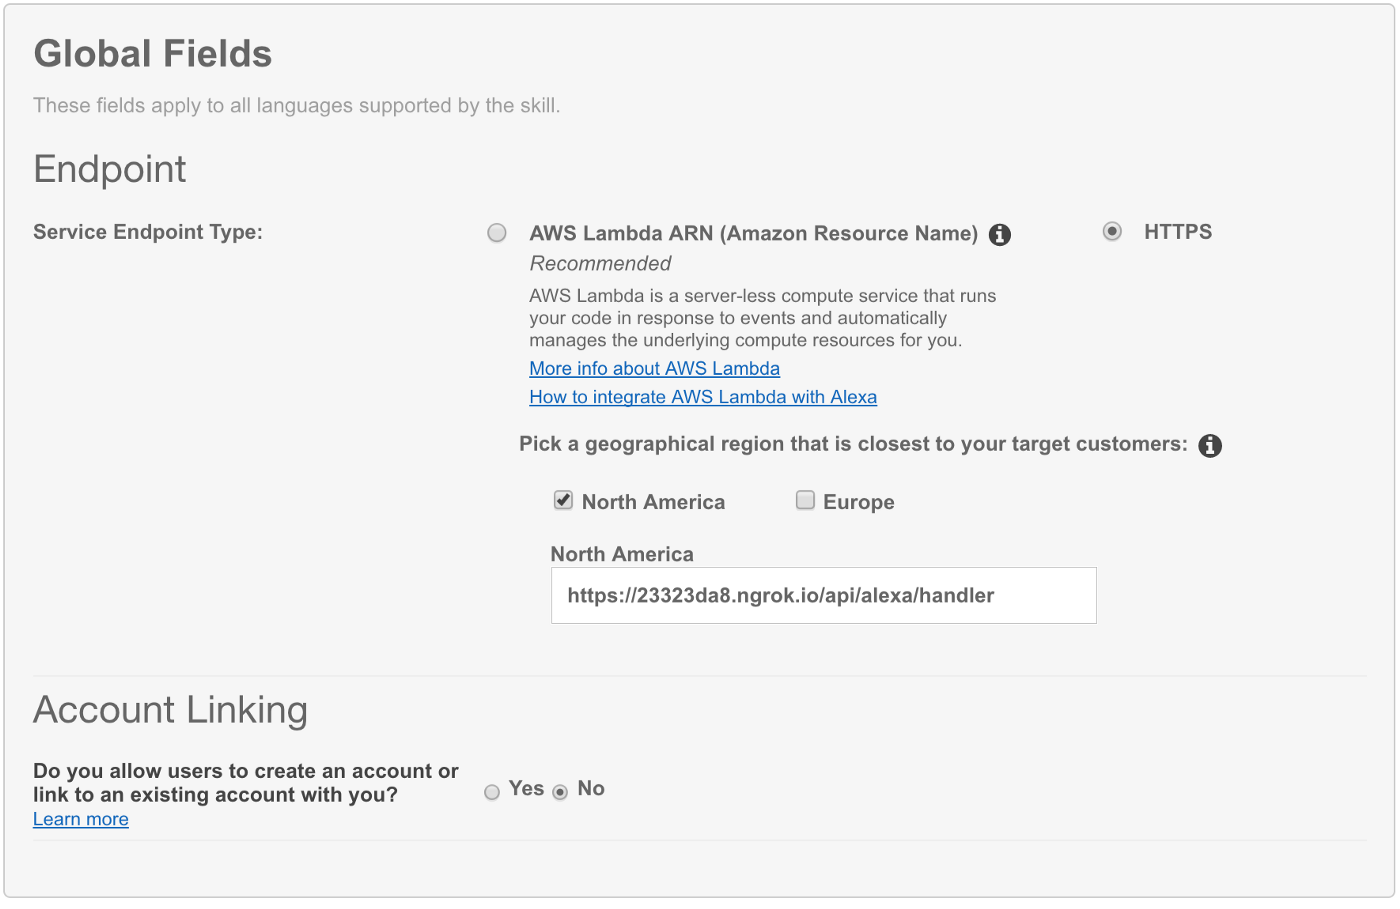
Let’s point Alexa at our application. Go to the Alexa skill you created earlier, click on “configuration” tab, and paste in the https link from ngrok, including the route we created:
Now let’s test!
Go to the “Test” tab in your Alexa skill, and type in an utterance. If you did everything correctly, you should see output similar to below:
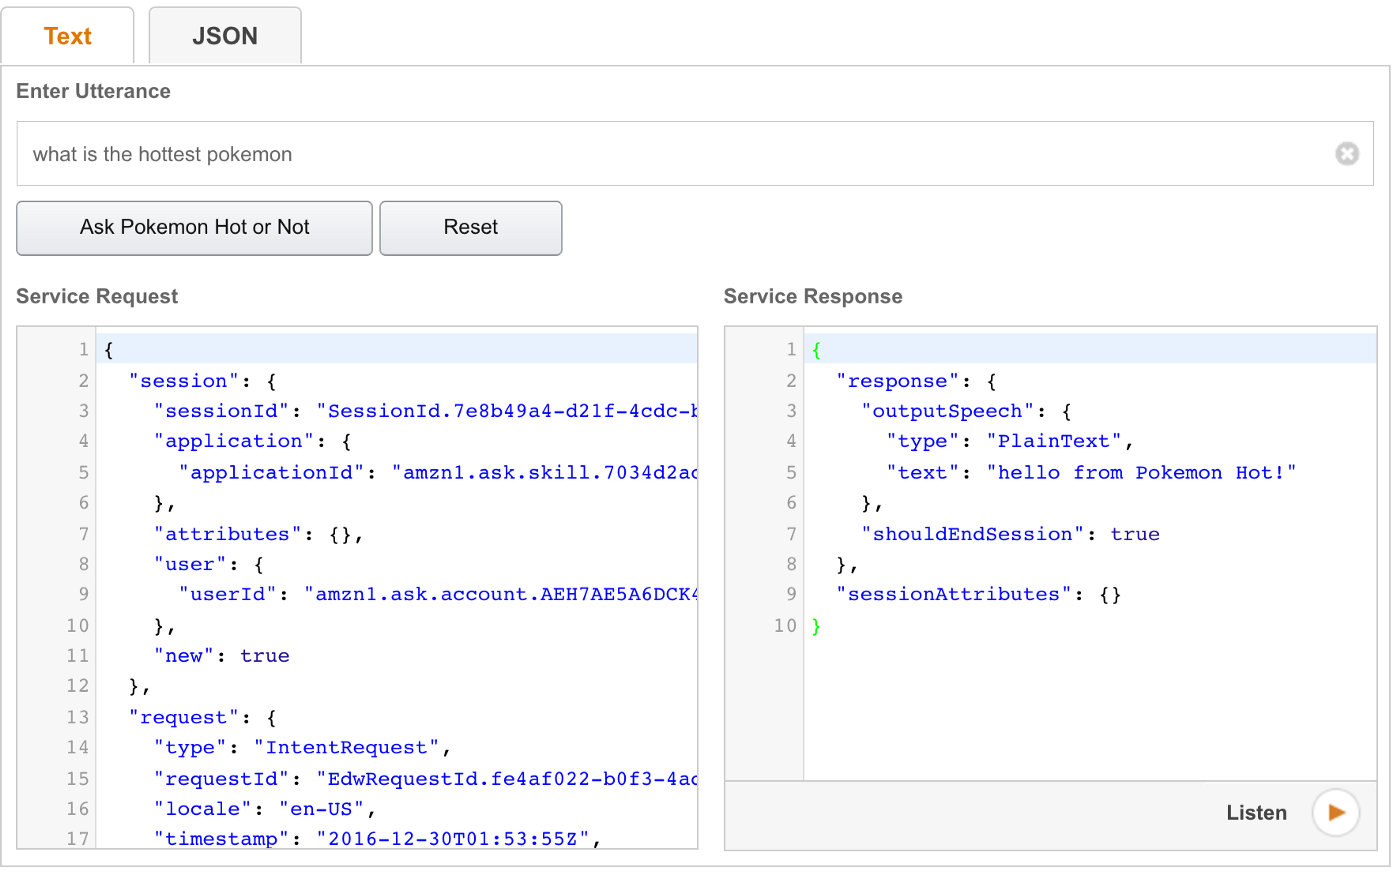
Great Job! You see we got a response back from our API. You can even hear Alexa say it out loud by clicking the “Listen” button. This is another great opportunity to take a break. We’ll finish this up when you get back!
Step Three: Authenticate users with DoorKeeper and Query on their behalf
This is where things get very interesting. We have the building blocks in place currently, and now it’s time to finalize everything. We are going to focus on a few major things from here on out:
- Install Doorkeeper to become an Oauth2 provider
- create application in Doorkeeper for Amazon to connect with
- configure Doorkeeper to play nicely with Amazon and how Amazon handles tokens
- flesh out actual responses for our api
Install and configure Doorkeeper
Doorkeeper is a great gem that allows you to introduce OAuth 2 provider functionality to your Rails application. Let’s install and configure Doorkeeper.
#gemfile.rb
gem 'doorkeeper'
Then generate migrations and boilerplate Doorkeeper stuff:
 bundle
Rails generate doorkeeper:install
Rails generate doorkeeper:migration
rake db:migrate
Then make sure Doorkeeper added routes to your app:
#config/routes.rb
Rails.application.routes.draw do
  use_doorkeeper
  # your routes
end
Configure Doorkeeper to use the current_user in resource_owner_authenticator. Since we use Devise, this is handled easily:
#config/initializers/doorkeeper.rb
  resource_owner_authenticator do
    # Put your resource owner authentication logic here.
    # Example implementation:
    current_user || warden.authenticate!(:scope => :user)
  end
For our purpose, we’re going to use “implicit grant” for OAuth. Configure that in Doorkeeper config again:
#config/initializers/doorkeeper.rb

# implicit and password grant flows have risks that you should understand
# before enabling:
#   http://tools.ietf.org/html/rfc6819#section-4.4.2
#   http://tools.ietf.org/html/rfc6819#section-4.4.3
grant_flows %w(implicit)
Create an OAuth application in Doorkeeper to handle the Amazon requests
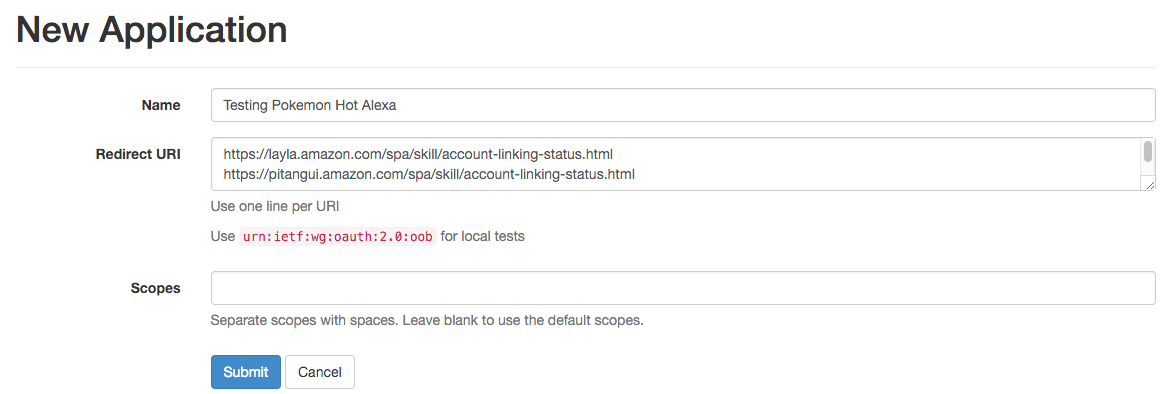
This is pretty straightforward, you need an application for Amazon to connect to. You set this up in both Doorkeeper and Amazon. First, go to your local Doorkeeper applications instance. (Mine is running at http://localhost:3000/oauth/applications.) Click "New Application". You can name this application whatever you want.
For the “redirect URIs”, go to your Amazon developer account, click on “Configuration” in your custom skill, then click “Yes” for account linking.
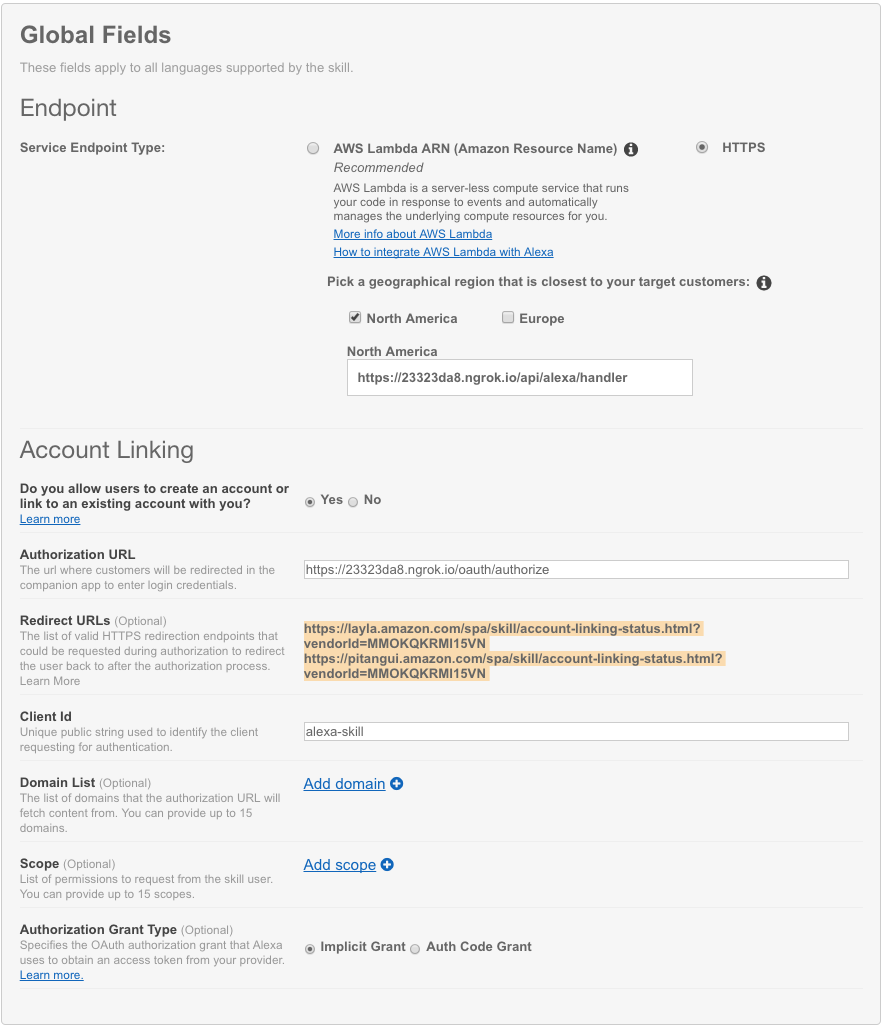
- In the “Authorization URL” field, put in your ngrok URL for OAuth. It is
/oauth/authorizein standard Doorkeeper installs. - Copy the two redirect urls (highlighted above). Doorkeeper will redirect to one of these after linking a user account
Next, go back to Doorkeeper and finish your new application
One thing to note: Doorkeeper does not allow query params in Redirect URI’s see Github issue here. Make sure to remove the trailing ?vendor=XXXXXXX from your redirect_uris from Amazon when pasting into Doorkeeper.
After hitting “Submit” you should have an application for Amazon to connect to!
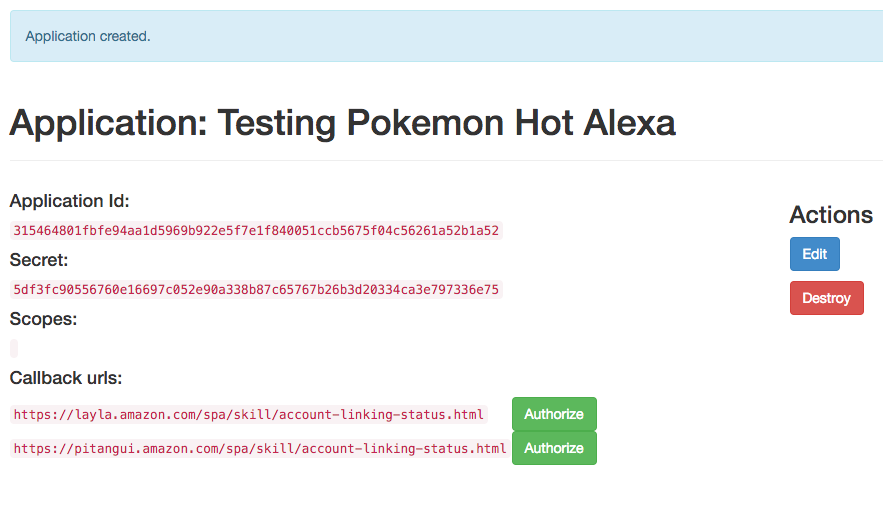
Now copy and paste your application ID to Amazon’s Client Id field under "Account Linking" and hit save!
Let’s test this out
Restart your server and “Authorize” the app with Amazon.
If you don’t already have an Alexa account, create one with the same email as your developer account. Then, go to alexa.amazon.com, click on ‘home’ and click ‘Your skills’ at the top right. You should see your custom skill listed there. Click on it and authorize:
Awesome! We’re almost there!
Protect controller with Doorkeeper
It’s time to finally handle the intents and grab information from an actual linked user! Let’s configure our alexa/handler controller to 'handle' the requests and respond with actual data.
First things first, let’s protect the controller with Doorkeeper. We’re going to add a few methods that I will explain shortly.
#controllers/api/alexa/handlers_controller.rb
prepend_before_action :set_access_token_in_params
before_action :doorkeeper_authorize!

def current_doorkeeper_user
  @current_doorkeeper_user ||= User.find(doorkeeper_token.resource_owner_id)
end

def set_access_token_in_params
  request.parameters[:access_token] = token_from_params
end

def token_from_params
  params["session"]["user"]["accessToken"] rescue nil
end
dookeeper_authorize!is what Doorkeeper uses to protect actions from unauthorized usersset_access_token_in_paramstakes a bit of explanation. When Amazon sends a request to your API, it includes theaccessTokenfor the user in a nested JSON object. Doorkeeper doesn't know where to look for this access token, so we prepend ourbefore_actionwith a method that movesaccess_tokeninto the params where Doorkeeper expects it.current_doorkeeper_useris just our convenience method for grabbing a user from the passed over access_token.
Actually get user data for responses
We are just about done! Now let’s grab information from the actual database and return it to the user depending on what they asked our app for. If you remember, we have two intents to handle “HottestPokemon” and “LastPokemonVote”.
- For “HottestPokemon”, we’ll grab the Pokemon with the most vote and return the name
- For “LastPokemonVote”, we’ll get the most recent vote from the user, and return the name of the Pokemon they voted for.
The final code should look like this
class Api::Alexa::HandlersController < ActionController::Base
  prepend_before_action :set_access_token_in_params
  before_action :doorkeeper_authorize!

  def create
    user = current_doorkeeper_user
    intent_name = params["request"]["intent"]["name"]
    case intent_name
    when "HottestPokemon"
      Pokemon = Pokemon.order(vote_count: :desc).first
      message = "The hottest Pokemon is #{Pokemon.name}!"
      render response_with_message(message)
    when "LastPokemonVote"
      Pokemon = user.votes.order(created_at: :desc).first.Pokemon
      message = "Your last vote was for #{Pokemon.name}"
      render response_with_message(message)
    else
      #error somehow
      render response_with_message("Error. We couldn't find your request")
    end
  end

  def current_doorkeeper_user
    @current_doorkeeper_user ||= User.find(doorkeeper_token.resource_owner_id)
  end

  private

  def response_with_message(message)
    {
      json: {
        "response": {
          "outputSpeech": {
            "type": "PlainText",
            "text": message,
          },
          "shouldEndSession": true
        },
        "sessionAttributes": {}
      }
    }
  end

  def set_doorkeeper_token
    request.parameters[:access_token] = token_from_params
  end

  def token_from_params
    params["session"]["user"]["accessToken"] rescue nil
  end
end
For simplicity, we use a case-statement based on the params["request"]["intent"]["name"] passed along from Alexa. From there, we find data from our database, and return the message to our user.
If you’d like to see the demo app used in this post, check it out here
Your Turn
This tutorial scratches the surface of what is possible with an open platform like Alexa. Although this demo showcases simple responses, you can build complex interactions that span multiple skills. Contact us if you have an idea for a custom skill you would like to integrate for your business.


